〇、什么是Linux操作系统
Linux 是一种自由和开放源码的类 UNIX 操作系统。
Linux 是在 1991 由林纳斯·托瓦兹(Linus Torvalds)在赫尔辛基大学上学时编写的(真屌啊,人和人的差距怎么这么大!),主要受到 Minix 和 Unix 思想的启发。
Linux 的发行版说简单点就是将 Linux 内核与应用软件做一个打包。这里可以下载到常见的发行版:Download Linux | Linux.org
一、Linux的文件系统结构
在 Linux 或 Unix 操作系统中,所有的文件和目录都被组织成以一个根节点开始的倒置的树状结构。
文件系统的最顶层是由根目录开始的,系统使用 / 来表示根目录。在根目录之下的既可以是目录,也可以是文件,而每一个目录中又可以包含子目录文件。如此反复就可以构成一个庞大的文件系统。
在Linux文件系统中有两个特殊的目录,一个用户所在的工作目录,也叫当前目录,可以使用一个点 . 来表示;另一个是当前目录的上一级目录,也叫父目录,可以使用两个点 … 来表示。
.:代表当前的目录,也可以使用 ./ 来表示;..:代表上一层目录,也可以 …/ 来代表。
如果一个目录或文件名以一个点 . 开始,表示这个目录或文件是一个隐藏目录或文件(如:.bashrc)。即以默认方式查找时,不显示该目录或文件。
Linux下的文件分隔标志是/,Windows下是\
系统启动必须:
-
/boot:存放的启动Linux 时使用的内核文件,包括连接文件以及镜像文件。
-
/etc:存放所有的系统需要的配置文件和**子目录列表,**更改目录下的文件可能会导致系统不能启动。
/etc/passwd —>存储所有用户信息
/etc/group ---->存储所有组的信息
/etc/shadow —>存储密码
-
/lib:存放基本代码库(比如c++库),其作用类似于Windows里的DLL文件。几乎所有的应用程序都需要用到这些共享库。
-
/sys:这是linux2.6内核的一个很大的变化。该目录下安装了2.6内核中新出现的一个文件系统 sysfs 。sysfs文件系统集成了下面3种文件系统的信息:针对进程信息的proc文件系统、针对设备的devfs文件系统以及针对伪终端的devpts文件系统。该文件系统是内核设备树的一个直观反映。当一个内核对象被创建的时候,对应的文件和目录也在内核对象子系统中
指令集合:
-
/bin:存放着最常用的程序和指令
-
/sbin:只有系统管理员能使用的程序和指令。
外部文件管理:
-
**/dev **:Device(设备)的缩写, 存放的是Linux的外部设备。**注意:**在Linux中访问设备和访问文件的方式是相同的。
-
/media:windows的**其他设备,**例如U盘、光驱等等,识别后linux会把设备放到这个目录下。
-
/mnt:临时挂载别的文件系统的,我们可以将光驱挂载在/mnt/上,然后进入该目录就可以查看光驱里的内容了。
临时文件:
-
/run:是一个临时文件系统,存储系统启动以来的信息。当系统重启时,这个目录下的文件应该被删掉或清除。如果你的系统上有 /var/run 目录,应该让它指向 run。
-
/lost+found:一般情况下为空的,系统非法关机后,这里就存放一些文件。
-
/tmp:这个目录是用来存放一些临时文件的。
账户:
-
/root:系统管理员的用户主目录。
-
/home:用户的主目录,以用户的账号命名的。
-
/usr:用户的很多应用程序和文件都放在这个目录下,类似于windows下的program files目录。
-
/usr/bin:系统用户使用的应用程序与指令。
-
/usr/sbin:超级用户使用的比较高级的管理程序和系统守护程序。
-
/usr/src:内核源代码默认的放置目录。
运行过程中要用:
-
/var:存放经常修改的数据,比如程序运行的日志文件(/var/log 目录下)。
-
/proc:管理**内存空间!**虚拟的目录,是系统内存的映射,我们可以直接访问这个目录来,获取系统信息。这个目录的内容不在硬盘上而是在内存里,我们也可以直接修改里面的某些文件来做修改。
扩展用的:
-
/opt:默认是空的,我们安装额外软件可以放在这个里面。
-
/srv:存放服务启动后需要提取的数据 (不用服务器就是空)
二、Linux常用命令
查看手册页->man
man命令是Linux和Unix系统中非常重要的命令之一,可以帮助用户查找和理解系统命令和函数的使用。
手册页是有关系统命令、函数和文件格式的详细文档,提供了有关它们如何工作、如何使用以及相关选项的信息。
语法
1 | man [选项] [命令/函数/文件...] |
用法示例
-
查看命令的手册页:
1
man ls
这会显示与
ls命令相关的手册页,其中包含了关于ls命令的详细说明、选项以及使用方法。 -
查看系统调用函数的手册页:
1
man open
这会显示有关
open系统调用函数的手册页,其中包含了有关该函数的详细信息。
选项
-k:按关键字搜索手册页。-f:显示与给定函数相关的手册页。-section:指定手册页的特定部分。例如,man 3 printf将显示与printf函数相关的手册页(第 3 部分,通常是库函数)。
使用技巧
- 使用
/进行关键字搜索:在man页面中,按/键,然后输入要查找的关键字,按回车键进行搜索。 - 使用
q键退出手册页查看。 - 手册页分为不同的部分,例如 1(用户命令),2(系统调用),3(C库函数),等等。可以使用
man命令的-section选项来指定要查看的手册页的特定部分。
命令提示符
1 | linus@ubuntu:~$ |
切换用户->su
1 | su [用户名] |
修改密码->passwd
1 | passwd 用户名 |
创建文件->touch
1 | touch 文件名1 文件名2 文件名3 |
删除文件->rm
1 | rm 文件名1 文件名2 文件名3 ··· |
创建目录文件->mkdir
1 | mkdir 目录的路径 ---->在指定路径下创建目录 |
修改文件的权限 ->chmod
Linux chmod(英文全拼:change mode)命令是控制用户对文件的权限的命令
Linux/Unix 的文件调用权限分为三级 : 文件所有者(Owner)、用户组(Group)、其它用户(Other Users)。
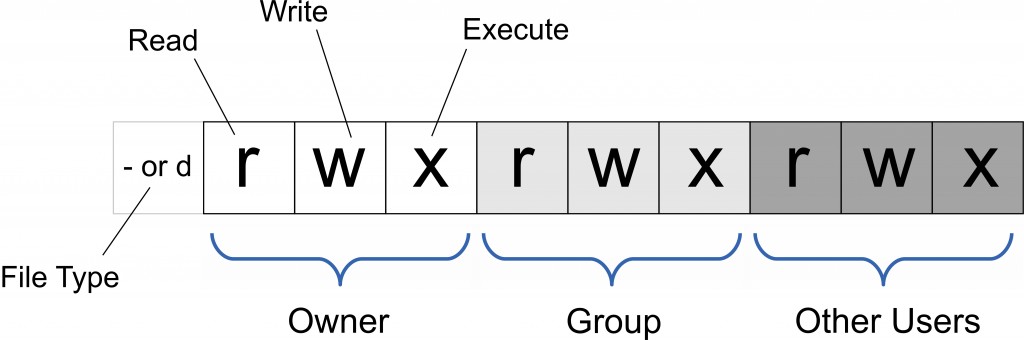
只有文件所有者和超级用户可以修改文件或目录的权限。可以使用绝对模式(八进制数字模式),符号模式指定文件的权限。

语法
1 | chmod [-cfvR] [--help] [--version] mode file... |
绝对路径->pwd
用于显示当前工作目录(Present Working Directory)的路径。这个命令可以帮助你确定当前所在的目录位置。
-L:显示逻辑路径,即软链接所指向的路径。-P:显示物理路径,即不使用软链接。
在实际使用中,pwd 常常与其他命令和脚本一起使用,以便在执行脚本或命令时确定当前工作目录的位置。
关机->shutdown
shutdown 会给系统计划一个时间关机。它可以被用于停止、关机、重启机器。
1 | shutdown -p now ### 关闭机器 |
要取消即将进行的关机,只要输入下面的命令:
1 | shutdown -c |
halt 命令通知硬件来停止所有的 CPU 功能,但是仍然保持通电。你可以用它使系统处于低层维护状态。注意在有些情况会它会完全关闭系统。
1 | halt ### 停止机器 |
poweroff 会发送一个 ACPI 信号来通知系统关机。
1 | poweroff ### 关闭机器、关闭电源 |
reboot 命令 reboot 通知系统重启。
1 | reboot ### 重启机器 |
三、vim/vi 编辑器
vim 是一个程序开发工具而不是文字处理软件
vi/vim 共分为三种模式,命令模式(Command Mode)、输入模式(Insert Mode)和命令行模式(Command-Line Mode)。
命令模式
- i – 切换到输入模式,在光标当前位置开始输入文本。
- x – 删除当前光标所在处的字符。
- : – 切换到底线命令模式,以在最底一行输入命令。
- a – 进入插入模式,在光标下一个位置开始输入文本。
- o:在当前行的下方插入一个新行,并进入插入模式。
- O – 在当前行的上方插入一个新行,并进入插入模式。
- dd – 删除当前行。
- yy – 复制当前行。
- p(小写) – 粘贴剪贴板内容到光标下方。
- P(大写)-- 粘贴剪贴板内容到光标上方。
- u – 撤销上一次操作。
- Ctrl + r – 重做上一次撤销的操作。
- :w – 保存文件。
- :q – 退出 Vim 编辑器。
- :q! – 强制退出Vim 编辑器,不保存修改。
- nyy --从光标所在行开始复制向下n行
行间跳转:
- gg 跳转到文件的首行
- G 跳转到文件的最后一行
- ngg 跳转到文件的第n行
- nG 跳转到文件的第n行
- gg=G 整个文本的格式化操作
- ngg=mgg n-m行的文本格式化
- nG=mG n-m行的格式化 ngg=mG n-m行的格式化
- $ 跳转到光标所在行的行尾
- 0 跳转到光标所在行的行首
输入模式
在命令模式下按下 i 就进入了输入模式,使用 Esc 键可以返回到普通模式。
- 字符按键以及Shift组合,输入字符
- ENTER,回车键,换行
- BACK SPACE,退格键,删除光标前一个字符
- DEL,删除键,删除光标后一个字符
- 方向键,在文本中移动光标
- HOME/END,移动光标到行首/行尾
- Page Up/Page Down,上/下翻页
- Insert,切换光标为输入/替换模式,光标将变成竖线/下划线
- ESC,退出输入模式,切换到命令模式
底线命令模式
在命令模式下按下 :(英文冒号)就进入了底线命令模式。
底线命令模式可以输入单个或多个字符的命令,可用的命令非常多。
在底线命令模式中,基本的命令有(已经省略了冒号):
:w:保存文件。:q:退出 Vim 编辑器。:wq:保存文件并退出 Vim 编辑器。:q!:强制退出Vim编辑器,不保存修改。:set ts=4设置tab为4个空格:noh取消高亮:set nu/nonu显示/取消行号
按 ESC 键可随时退出底线命令模式。
修改vim配置
通过配置 ~/.vimrc 文件,可以定制化 Vim 的行为以适应个人需求。
-
基本设置:
1
2
3
4
5
6
7
8
9set nocompatible " 禁用 Vi 兼容模式
set number " 显示行号
set relativenumber " 使用相对行号
set nowrap " 禁用自动换行
set autoindent " 自动缩进
set smartindent " 智能缩进
set tabstop=4 " Tab 键宽度为 4 个空格
set shiftwidth=4 " 设置自动缩进的宽度为 4 个空格
set expandtab " 将 Tab 转换为空格 -
颜色主题:
1
2" 在 ~/.vim/colors/ 目录中放置主题文件
colorscheme desert " 使用 desert 主题 -
插件管理器:
使用插件管理器可以更方便地安装和管理插件。例如,使用 Vundle:
1
2
3
4
5
6
7
8
9
10
11
12" 安装 Vundle
set nocompatible
filetype off
set rtp+=~/.vim/bundle/Vundle.vim
call vundle#begin()
" 在这里添加插件,例如:
" Plugin 'VundleVim/Vundle.vim'
" Plugin 'tpope/vim-fugitive'
call vundle#end()
filetype plugin indent on然后,在命令模式下执行
:PluginInstall安装配置文件中列出的插件。 -
快捷键映射:
1
2
3
4
5
6
7
8" 映射 <Leader> 为逗号
let mapleader=","
" 在 normal 模式下按 ,w 保存文件
nnoremap <Leader>w :w<CR>
" 在 normal 模式下按 ,q 退出 Vim
nnoremap <Leader>q :q<CR> -
搜索和替换:
1
2
3
4
5
6
7
8
9
10
11" 搜索时忽略大小写
set ignorecase
" 搜索时大小写敏感
set smartcase
" 启用增强搜索
set incsearch
" 高亮搜索结果
set hlsearch -
其他常用设置:
1
2
3
4
5
6" 启用行尾空格高亮显示
highlight ExtraWhitespace ctermbg=red guibg=red
match ExtraWhitespace /\s\+$/
" 在文件末尾自动添加换行符
set endofline我使用的配置文件
1
2
3
4
5
6
7
8
9
10
11
12
13
14
15
16
17
18
19
20
21
22
23
24
25
26
27
28
29
30
31
32
33
34
35
36
37
38
39
40
41
42
43
44
45
46
47
48
49
50
51
52
53
54
55
56
57
58
59
60
61
62
63
64
65
66
67
68
69
70
71
72
73
74
75
76
77
78
79
80
81
82
83
84
85
86
87
88
89
90
91
92
93
94
95
96
97
98
99
100
101
102
103
104
105
106
107
108
109
110
111
112
113
114
115
116
117
118
119
120
121
122
123
124
125
126
127
128
129
130
131
132
133
134
135
136
137
138
139
140
141
142
143
144
145
146
147
148
149
150
151
152
153
154
155
156
157
158
159
160
161
162
163
164
165
166
167
168
169
170
171
172
173
174
175
176
177
178
179
180
181
182
183
184
185
186
187
188
189
190
191
192
193
194
195
196
197
198
199
200
201
202" .vimrc - Vim configuration file.
"
" Copyright (c) 2010 Jeffy Du. All Rights Reserved.
"
" Maintainer: Jeffy Du <jeffy.du@gmail.com>
" Created: 2010-01-01
" LastChange: 2010-04-22
" GENERAL SETTINGS: {{{1
" To use VIM settings, out of VI compatible mode.
set nocompatible
" Enable file type detection.
filetype plugin indent on
" Syntax highlighting.
syntax on
" Setting colorscheme
color mycolor
" Other settings.
set autoindent
set autoread
set autowrite
set background=dark
set backspace=indent,eol,start
set nobackup
set cindent
set cinoptions=:0
set cursorline
set completeopt=longest,menuone
set noexpandtab
set fileencodings=utf-8,gb2312,gbk,gb18030
set fileformat=unix
set foldenable
set foldmethod=marker
set guioptions-=T
set guioptions-=m
set guioptions-=r
set guioptions-=l
set helpheight=10
set helplang=cn
set hidden
set history=100
set hlsearch
set ignorecase
set incsearch
set laststatus=2
set mouse=a
set number
set pumheight=10
set ruler
set scrolloff=5
set shiftwidth=4
set showcmd
set smartindent
set smartcase
set tabstop=4
set termencoding=utf-8
set textwidth=80
set whichwrap=h,l
set wildignore=*.bak,*.o,*.e,*~
set wildmenu
set wildmode=list:longest,full
set nowrap
" AUTO COMMANDS: {{{1
" auto expand tab to blanks
"autocmd FileType c,cpp set expandtab
" Restore the last quit position when open file.
autocmd BufReadPost *
\ if line("'\"") > 0 && line("'\"") <= line("$") |
\ exe "normal g'\"" |
\ endif
" SHORTCUT SETTINGS: {{{1
" Set mapleader
let mapleader=","
" Space to command mode.
nnoremap <space> :
vnoremap <space> :
" Switching between buffers.
nnoremap <C-h> <C-W>h
nnoremap <C-j> <C-W>j
nnoremap <C-k> <C-W>k
nnoremap <C-l> <C-W>l
inoremap <C-h> <Esc><C-W>h
inoremap <C-j> <Esc><C-W>j
inoremap <C-k> <Esc><C-W>k
inoremap <C-l> <Esc><C-W>l
" "cd" to change to open directory.
let OpenDir=system("pwd")
nmap <silent> <leader>cd :exe 'cd ' . OpenDir<cr>:pwd<cr>
" PLUGIN SETTINGS: {{{1
" taglist.vim
let g:Tlist_Auto_Update=1
let g:Tlist_Process_File_Always=1
let g:Tlist_Exit_OnlyWindow=1
let g:Tlist_Show_One_File=1
let g:Tlist_WinWidth=25
let g:Tlist_Enable_Fold_Column=0
let g:Tlist_Auto_Highlight_Tag=1
" NERDTree.vim
let g:NERDTreeWinPos="right"
let g:NERDTreeWinSize=25
let g:NERDTreeShowLineNumbers=1
let g:NERDTreeQuitOnOpen=1
" cscope.vim
if has("cscope")
set csto=1
set cst
set nocsverb
if filereadable("cscope.out")
cs add cscope.out
endif
set csverb
endif
" OmniCppComplete.vim
"set nocp
"filetype plugin on
let g:OmniCpp_DefaultNamespaces=["std"]
let g:OmniCpp_MayCompleteScope=1
let g:OmniCpp_SelectFirstItem=2
" VimGDB.vim
if has("gdb")
set asm=0
let g:vimgdb_debug_file=""
run macros/gdb_mappings.vim
endif
" LookupFile setting
let g:LookupFile_TagExpr='"./tags.filename"'
let g:LookupFile_MinPatLength=2
let g:LookupFile_PreserveLastPattern=0
let g:LookupFile_PreservePatternHistory=1
let g:LookupFile_AlwaysAcceptFirst=1
let g:LookupFile_AllowNewFiles=0
" Man.vim
source $VIMRUNTIME/ftplugin/man.vim
" snipMate
let g:snips_author="Du Jianfeng"
let g:snips_email="cmdxiaoha@163.com"
let g:snips_copyright="SicMicro, Inc"
" plugin shortcuts
function! RunShell(Msg, Shell)
echo a:Msg . '...'
call system(a:Shell)
echon 'done'
endfunction
nmap <F2> :TlistToggle<cr>
nmap <F3> :NERDTreeToggle<cr>
nmap <F4> :MRU<cr>
nmap <F5> <Plug>LookupFile<cr>
nmap <F6> :vimgrep /<C-R>=expand("<cword>")<cr>/ **/*.c **/*.h<cr><C-o>:cw<cr>
nmap <F9> :call RunShell("Generate tags", "ctags -R --c++-kinds=+p --fields=+iaS --extra=+q .")<cr>
nmap <F10> :call HLUDSync()<cr>
nmap <F11> :call RunShell("Generate filename tags", "~/.vim/shell/genfiletags.sh")<cr>
nmap <F12> :call RunShell("Generate cscope", "cscope -Rb")<cr>:cs add cscope.out<cr>
nmap <leader>sa :cs add cscope.out<cr>
nmap <leader>ss :cs find s <C-R>=expand("<cword>")<cr><cr>
nmap <leader>sg :cs find g <C-R>=expand("<cword>")<cr><cr>
nmap <leader>sc :cs find c <C-R>=expand("<cword>")<cr><cr>
nmap <leader>st :cs find t <C-R>=expand("<cword>")<cr><cr>
nmap <leader>se :cs find e <C-R>=expand("<cword>")<cr><cr>
nmap <leader>sf :cs find f <C-R>=expand("<cfile>")<cr><cr>
nmap <leader>si :cs find i <C-R>=expand("<cfile>")<cr><cr>
nmap <leader>sd :cs find d <C-R>=expand("<cword>")<cr><cr>
nmap <leader>zz <C-w>o
nmap <leader>gs :GetScripts<cr>
let Tlist_Show_One_File=0
set noswapfile
set tags+=/usr/include/tags
set tags+=./tags
map ta :!ctags -R --c++-kinds=+p --fields=+iaS --extra=+q .<CR>
let g:UltiSnipsJumpForwardTrigger = "<tab>"
let g:UltiSnipsJumpBackwardTrigger = "<s-tab>"
" 获取当前用户名
let s:current_user = $USER
" 设定默认版本号
let s:default_version = "1.0"
function! ReplaceTemplateVariables(timer_id)
let l:current_date = strftime("%Y-%m-%d")
let l:current_filename = expand('%:t')
" 替换对应的占位符
execute "%s/%DATE%/" . l:current_date . "/g"
execute "%s/%FILENAME%/" . l:current_filename . "/g"
execute "%s/%AUTHOR%/" . s:current_user . "/g"
execute "%s/%VERSION%/" . s:default_version . "/g"
" 设置光标位置
call cursor(13, 1)
endfunction
" 安装 Timer 插件(如果尚未安装)
if !exists('g:loaded_timer') && !exists('g:did_timer_plugin')
silent! timer defer timer_start 1
let g:did_timer_plugin = 1
endif
autocmd BufNewFile *.c 0r ~/.vim/templates/skeleton.c | call timer_start(100, 'ReplaceTemplateVariables')
主函数的自动补全
1 | cd ~ |
c.snippets:
1 |
|
四、Ubuntu换源
1.备份原来的源,将以前的源备份一下,以防以后可以用的。
1 | sudo cp /etc/apt/sources.list /etc/apt/sources.list.bak |
2.打开/etc/apt/sources.list文件,在前面添加如下条目,并保存。
1 | sudo vim /etc/apt/sources.list |
1 | 添加阿里源 |
3.更新
更新源
1 | sudo apt-get update |
如出现依赖问题,解决方式如下:
1 | sudo apt-get -f install |
更新软件:
1 | sudo apt-get upgrade |
附上网上找的各种源的地址
1.企业源:
阿里云开源镜像站: http://mirrors.aliyun.com/
搜狐开源镜像站:http://mirrors.sohu.com/
网易开源镜像站:http://mirrors.163.com/
2.教育源:
重庆大学:http://mirrors.cqu.edu.cn/
北京理工大学:
http://mirror.bit.edu.cn (IPv4 only)
http://mirror.bit6.edu.cn (IPv6 only)
北京交通大学:
http://mirror.bjtu.edu.cn (IPv4 only)
http://mirror6.bjtu.edu.cn (IPv6 only)
http://debian.bjtu.edu.cn (IPv4+IPv6)
兰州大学:http://mirror.lzu.edu.cn/
厦门大学:http://mirrors.xmu.edu.cn/
上海交通大学:
http://ftp.sjtu.edu.cn/ (IPv4 only)
http://ftp6.sjtu.edu.cn (IPv6 only)
清华大学:
http://mirrors.tuna.tsinghua.edu.cn/ (IPv4+IPv6)
http://mirrors.6.tuna.tsinghua.edu.cn/ (IPv6 only)
http://mirrors.4.tuna.tsinghua.edu.cn/ (IPv4 only)
天津大学:http://mirror.tju.edu.cn/
中国科学技术大学:
http://mirrors.ustc.edu.cn/ (IPv4+IPv6)
http://mirrors4.ustc.edu.cn/
http://mirrors6.ustc.edu.cn/
西南大学:http://linux.swu.edu.cn/swudownload/Distributions/
东北大学:
http://mirror.neu.edu.cn/ (IPv4 only)
http://mirror.neu6.edu.cn/ (IPv6 only)
电子科技大学:http://ubuntu.uestc.edu.cn/
青岛大学:http://mirror.qdu.edu.cn/
开源中国社区 http://mirrors.oss.org.cn/
大连东软信息学院 http://mirrors.neusoft.edu.cn/
华中科技大学 http://mirrors.hust.edu.cn/
中山大学 http://mirrors.sysu.edu.cn/
清华大学学生网管会 http://mirrors.tuna.tsinghua.edu.cn/
浙江大学 http://mirrors.zju.edu.cn/web/
台湾淡江大学 http://ftp.tku.edu.tw/Linux/
Linux运维派开源镜像 http://mirrors.skyshe.cn/