一、工具
1 什么是 Qt
Qt 是一个跨平台的 C++图形用户界面应用程序框架。
它为应用程序开发者提供建立艺术级图形界面所需的所有功能。
它是完全面向对象 的,很容易扩展,并且允许真正的组件编程。
2 Qt 的优点
跨平台,几乎支持所有的平台
接口简单,容易上手,学习 QT 框架对学习其他框架有参考意义。一定程度上简化了内存回收机制
开发效率高,能够快速的构建应用程序。
有很好的社区氛图,市场份额在缓慢上升。
可以进行嵌入式开发。
3 介绍QT
1
2
3
4
5
6
7
8
9
10
11
12
13
14
15
16
17
18
19
20
21
1. QT主要用于图形化界面的开发, QT是基于C++编写的一套界面相关的类库, 进程线程库,网络编程的库,数据库操作的库,文件操作的库..... 2. 学习QT, 掌握QT中的类库是做什么,如何使用这个类库 类库实例化对象(构造函数) --> 学习类库中方法(函数)的使用 --> 后台逻辑的实现 3. QT是一个跨平台的GUI图形化界面开发工具 4. QT的使用场合 汽车仪表盘 打印机 医疗器械 自动化的大型设备 5. QT的优点 1.跨平台,具有较为完备的图形开发库,你所能想到的的图形的实现基本都有,比window的MFC的库更强大。所以很多之前做桌面开发用MFC的都转了Qt。 2.接口的封装性好,易上手,学习QT框架对学习计算机图形框架有很重要的参考意义。 3.Qt内部基本上有一套自己的简易好用的内存回收机制,对提高C++水平有帮助。 4.有很好的社区环境,市场份额在缓慢上升。 5.轻量级的开发环境,可以做嵌入式开发
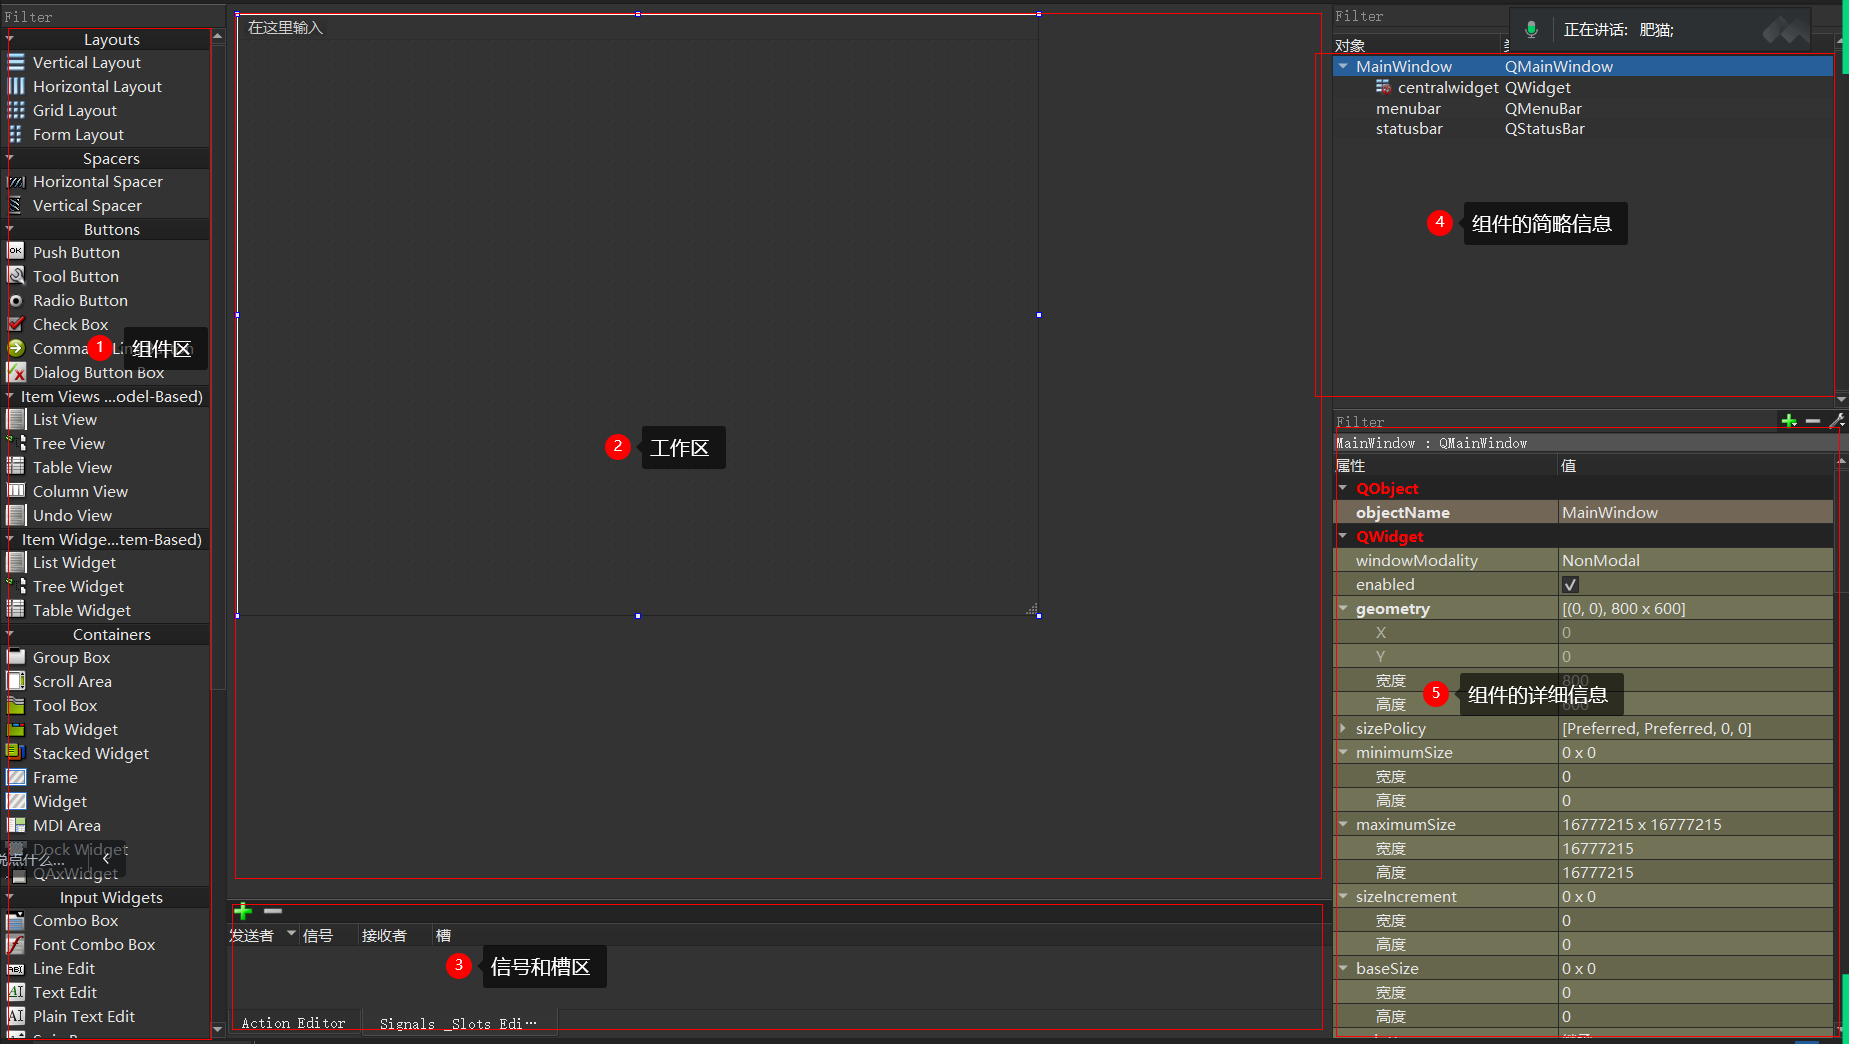
4 QT工具介绍
1
2
3
4
5
6
7
8
9
10
11
12
13
14
15
16
17
18
19
20
21
22
23
24
25
26
1. Assistant ---> QT类库的帮助手册的工具 2. Designer ---> 用来设计图形化界面 对应的界面文件为***.ui (ui文件中的内容是一种标记性的语言) 3. uic.exe ---> 将***.ui文件转换为标准的C++的代码 ui_***.h C:\Qt\5.15.2\mingw81_64\bin\uic.exe 在cmd终端下输入以下命令: C:\Qt\5.15.2\mingw81_64\bin\uic.exe designer.ui -o ui_designer.h 4. moc.exe ---> 元对象编辑器工具 C:\Qt\5.15.2\mingw81_64\bin\moc.exe 将QT中非标准的信号和槽,转换为标准的C++的代码 5. rcc.exe ---> 资源管理器 C:\Qt\5.15.2\mingw81_64\bin\rcc.exe 将QT资源文件(图片,音频文件,视频文件),转换为标准的C++代码 6. qmake ---> 工程管理的工具 QT工程文件的后缀为***.pro工程文件, qmake工具可以根据***.pro文件,生成Makefile文件, 通过Makefile文件编译C++的代码。 7. QTcreater --> QT集成开发环境工具(IDE) 将上边的所有的工具都集成到一起了。
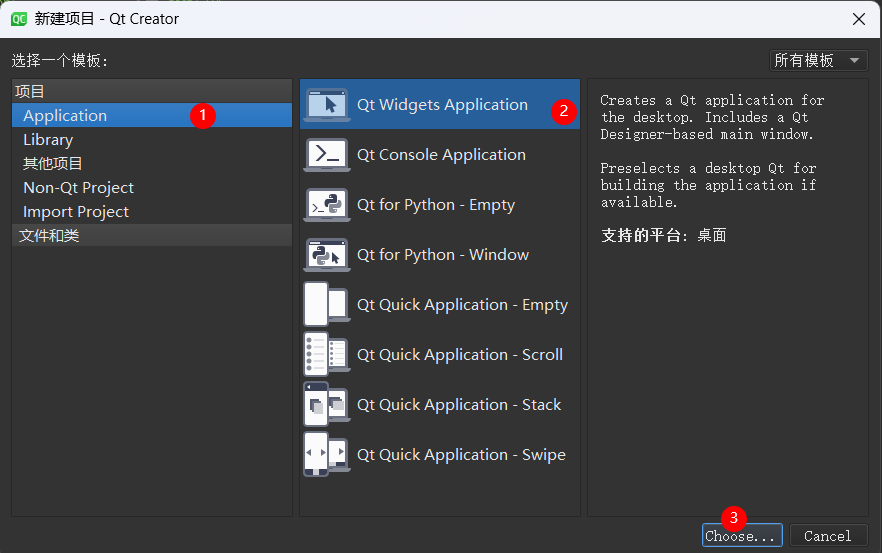
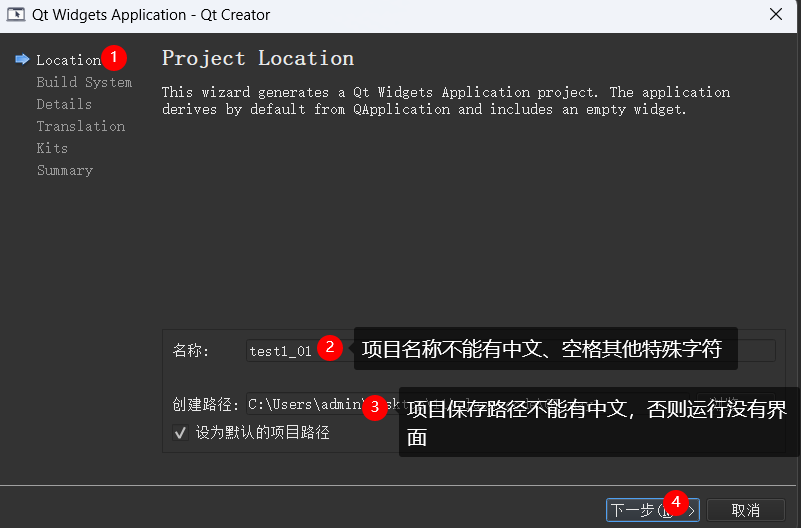
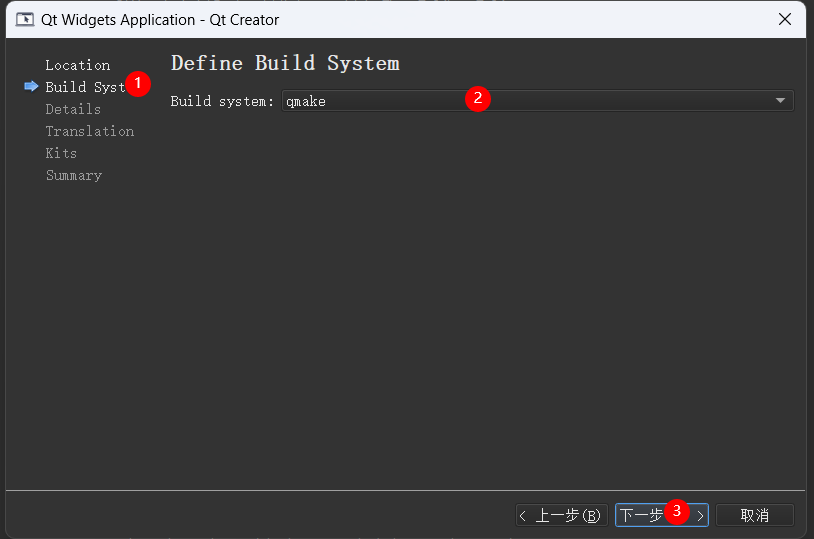
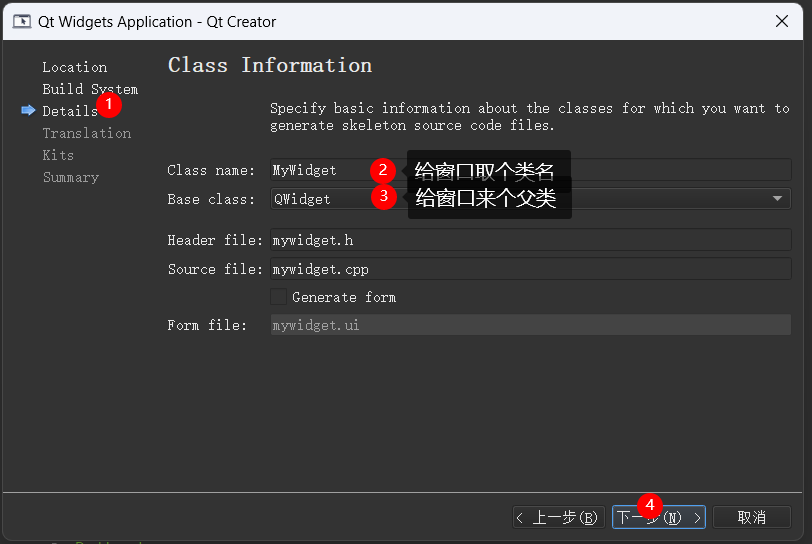
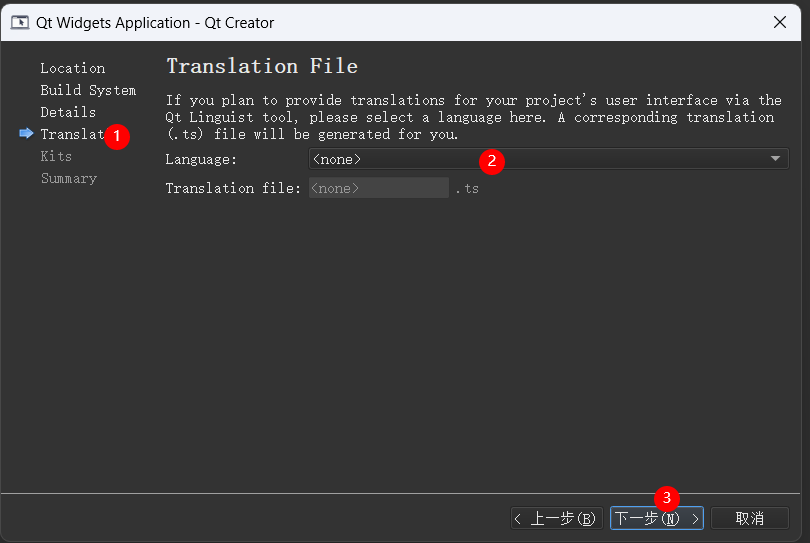
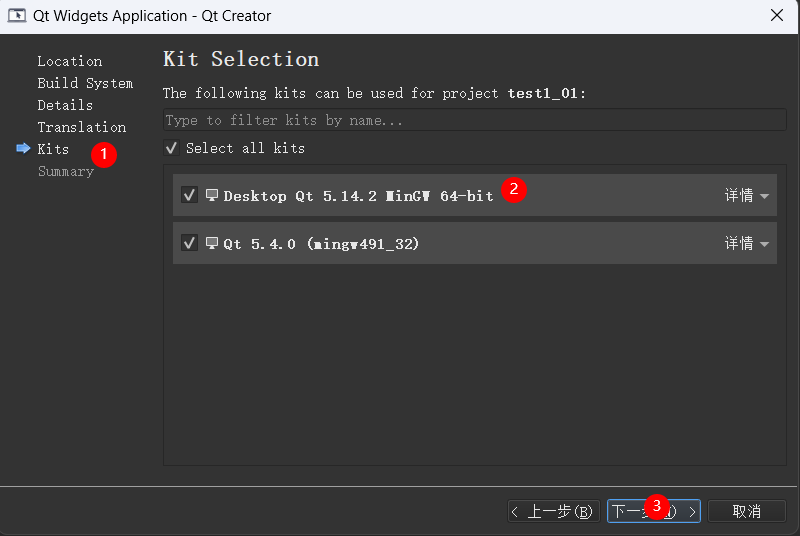
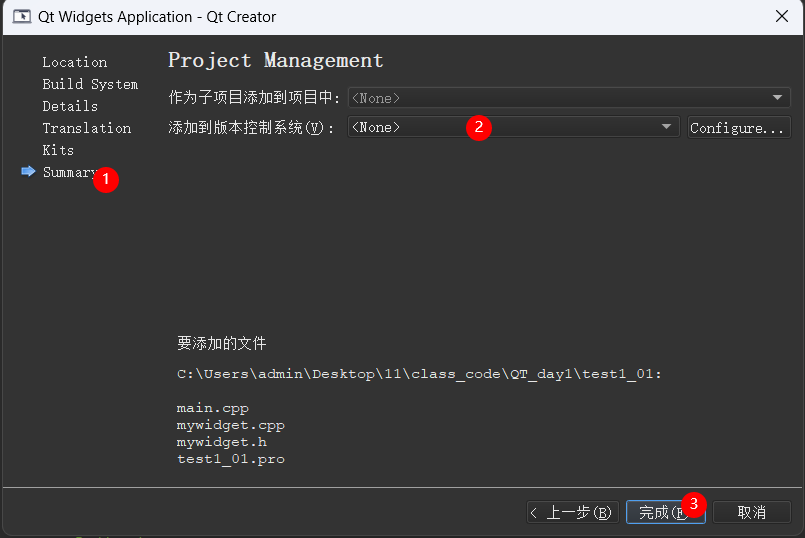
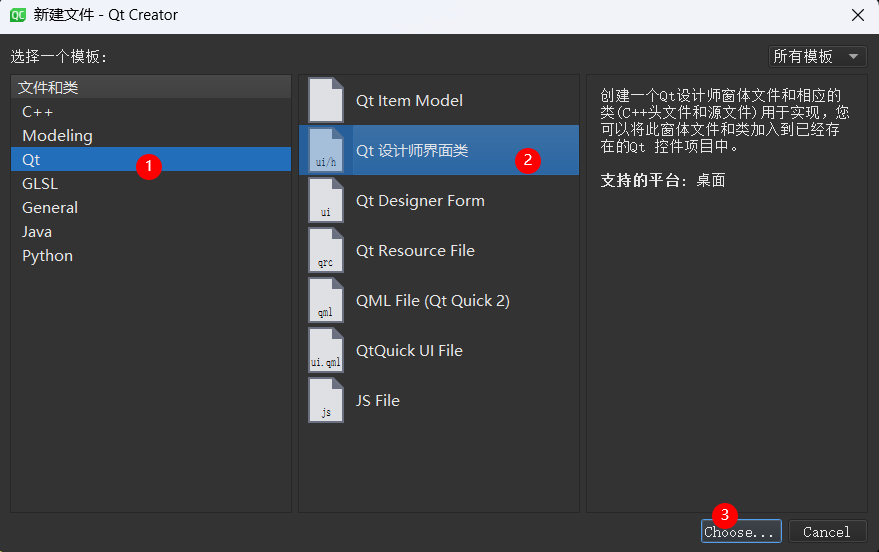
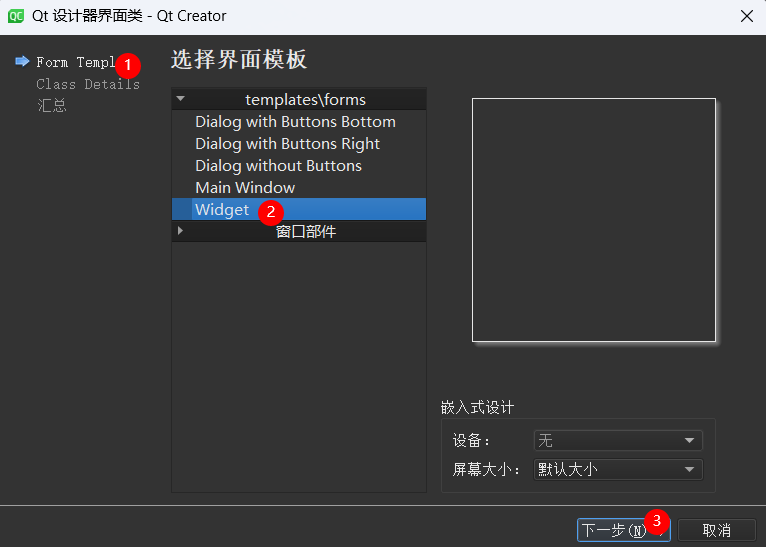
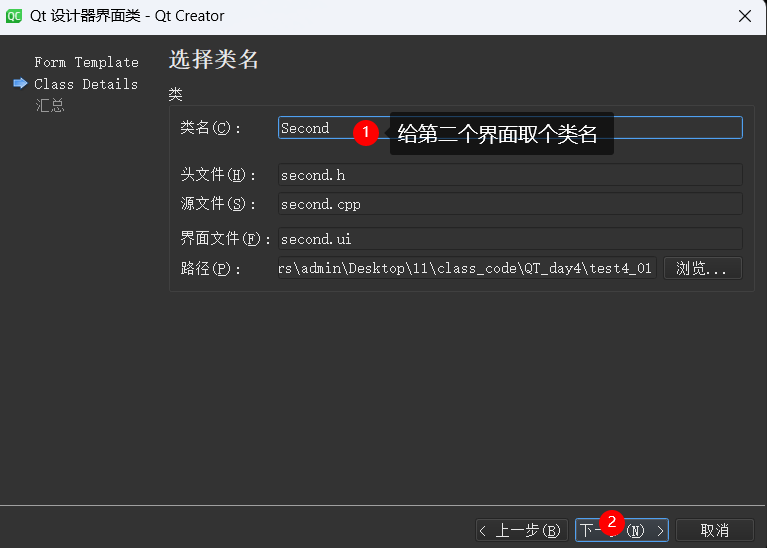
二、如何新建一个项目工程
三、各个文件中的相关介绍
项目工程文件
1
2
3
4
5
6
7
8
9
10
11
12
13
14
15
16
17
18
19
20
21
22
23
24
25
26
27
28
29
30
31
32
33
34
35
36
37
38
39
40
#项目工程文件 QT += core gui greaterThan(QT_MAJOR_VERSION, 4): QT += widgets CONFIG += c++11 # The following define makes your compiler emit warnings if you use # any Qt feature that has been marked deprecated (the exact warnings # depend on your compiler). Please consult the documentation of the # deprecated API in order to know how to port your code away from it. DEFINES += QT_DEPRECATED_WARNINGS # You can also make your code fail to compile if it uses deprecated APIs. # In order to do so, uncomment the following line. # You can also select to disable deprecated APIs only up to a certain version of Qt. #DEFINES += QT_DISABLE_DEPRECATED_BEFORE=0x060000 # disables all the APIs deprecated before Qt 6.0.0 SOURCES += \ main.cpp \ mywidget.cpp HEADERS += \ mywidget.h # Default rules for deployment. qnx: target.path = /tmp/$${TARGET}/bin else: unix:!android: target.path = /opt/$${TARGET}/bin !isEmpty(target.path): INSTALLS += target
源文件:
1 2 3 4 5 6 7 8 9 10 11 12 13 14 15 16 17 18 #include "mywidget.h" MyWidget::MyWidget (QWidget *parent) : QWidget (parent) { } MyWidget::~MyWidget () { }
头文件:
1 2 3 4 5 6 7 8 9 10 11 12 13 14 15 16 17 18 19 #ifndef MYWIDGET_H #define MYWIDGET_H #include <QWidget> class MyWidget : public QWidget{ Q_OBJECT public : MyWidget (QWidget *parent = nullptr ); ~MyWidget (); }; #endif
main.cpp
1 2 3 4 5 6 7 8 9 10 11 12 13 14 15 16 17 18 19 20 21 22 23 24 25 26 27 28 29 #include "mywidget.h" #include <QApplication> int main (int argc, char *argv[]) QApplication a (argc, argv) ; MyWidget w; w.show (); return a.exec (); }
四、 Qt中的信息调试类 (输出类) QDebug
1 2 3 4 5 6 7 8 9 10 11 qDebug ("%s" ,"hello kittiy" ); qDebug () << "你好" ; qDebug () << QString ("%1,%2,%3" ).arg (100 ).arg (200 ).arg (300 );
五、窗口的相关设置
5.1 窗口的尺寸、标题、背景颜色等设置 1 2 3 4 5 6 7 8 9 10 11 12 13 14 15 16 17 18 19 20 21 22 23 24 MyWidget::MyWidget (QWidget *parent) : QWidget (parent) { this ->setWindowTitle ("我的窗口" ); this ->setWindowIcon (QIcon ("C:\\Users\\admin\\Desktop\\pictrue\\qq.png" )); this ->setStyleSheet ("background-color:rgb(255,255,255)" ); this ->resize (540 ,410 ); }
5.2 求出当前窗口的大小
1 2 3 4 5 6 7 qDebug () << this ->size () << endl; qDebug () << this ->geometry ().width () << endl; qDebug () << this ->geometry ().height () << endl; qDebug () << this ->width () << endl;qDebug () << this ->height () << endl;qDebug () << width () << endl;qDebug () << height () << endl;
六、常用类以及组件的使用
6.1 按钮类 QPushBtutton
1 2 3 4 5 6 7 8 9 10 11 12 13 14 15 16 17 18 19 20 21 22 23 24 25 26 27 28 29 30 31 32 33 34 35 36 MyWidget::MyWidget (QWidget *parent) : QWidget (parent) { QPushButton *btn1 = new QPushButton; btn1->setParent (this ); btn1->setText ("第一个按钮" ); btn1->setStyleSheet ("background-color:pink" ); btn1->setIcon (QIcon ("C:\\Users\\admin\\Desktop\\pictrue\\qq.png" )); QPushButton *btn2 = new QPushButton ("第二个按钮" ,this ); btn2->move (200 ,100 ); btn2->resize (100 ,50 ); QPushButton *btn3 = new QPushButton (QIcon ("C:\\Users\\admin\\Desktop\\pictrue\\qq.png" ),"第三个按钮" ,this ); btn3->move (300 ,300 ); btn3->setEnabled (false ); }
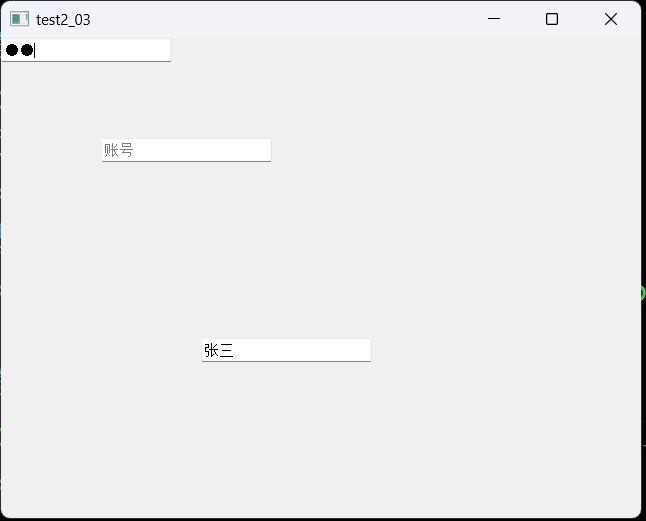
6.2 行编辑器类 QLineEdit
1 2 3 4 5 6 7 8 9 10 11 12 13 14 15 16 17 18 19 20 21 22 23 24 Widget::Widget (QWidget *parent) : QWidget (parent) { QLineEdit *edit1 = new QLineEdit; edit1->setParent (this ); edit1->setEchoMode (QLineEdit::Password); QLineEdit *edit2 = new QLineEdit ("张三" ,this ); edit2->move (200 ,300 ); QLineEdit *edit3 = new QLineEdit (this ); edit3->setPlaceholderText ("账号" ); edit3->move (100 ,100 ); }
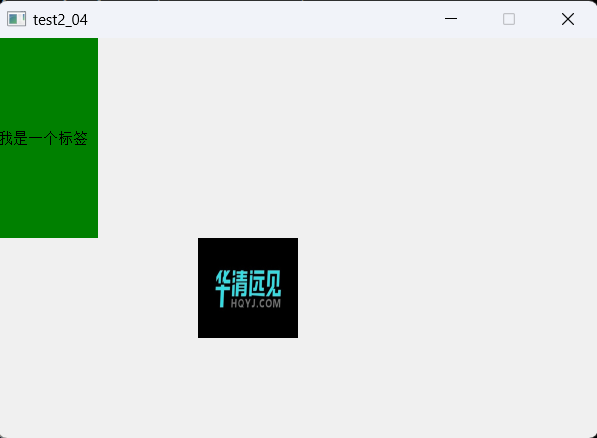
6.3 标签类 QLabel
标签一般用来显示图像或者文本的。
1 2 3 4 5 6 7 8 9 10 11 12 13 14 15 16 17 18 19 20 21 22 23 Widget::Widget (QWidget *parent) : QWidget (parent) { this ->resize (600 ,400 ); this ->setFixedSize (600 ,400 ); QLabel *lab1 = new QLabel; lab1->setParent (this ); lab1->setText ("我是一个标签" ); lab1->resize (100 ,200 ); lab1->setStyleSheet ("background-color:green" ); QLabel *lab2 = new QLabel ("标签" ,this ); lab2->move (200 ,200 ); lab2 ->resize (100 ,100 ); lab2->setPixmap (QPixmap ("C:\\Users\\admin\\Desktop\\pictrue\\logo.png" )); lab2->setScaledContents (true ); }
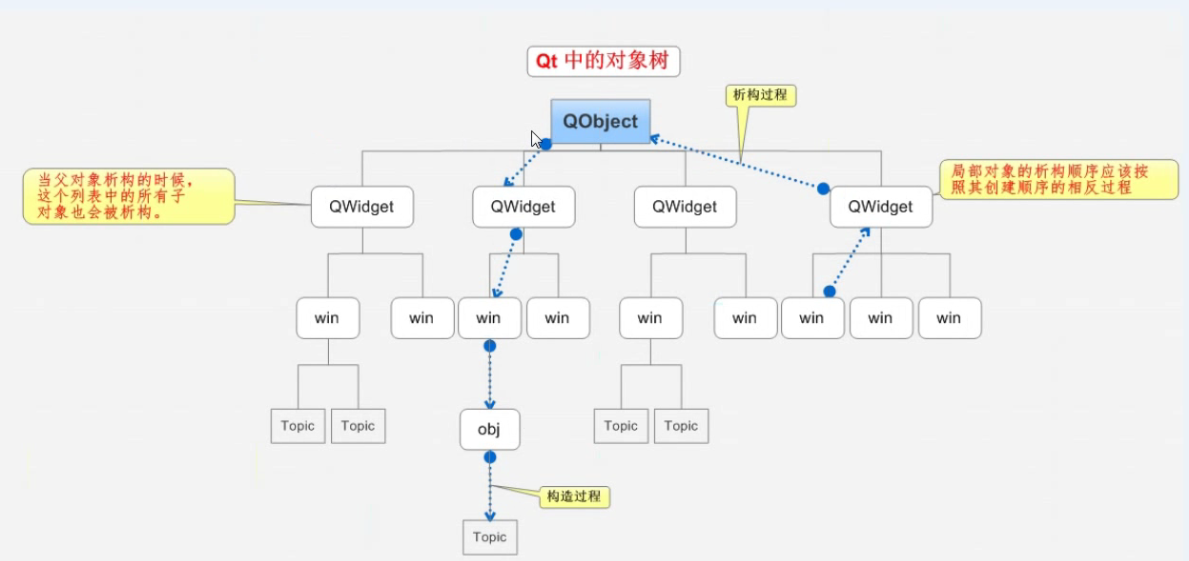
七、对象树
qt引以为傲的核心机制:对象树、信号和槽、事件机制
当一个组件指定父组件(父对象)时,就可以不用管它的释放操作,因为父对象会将子对象丢到对象树上,父对象在释放之前,会确保子对象释放后,再释放自己。
注意:对象之间的父子关系 和 继承之间的父子关系 不是一回事
一定程度上简化了内存回收机制。
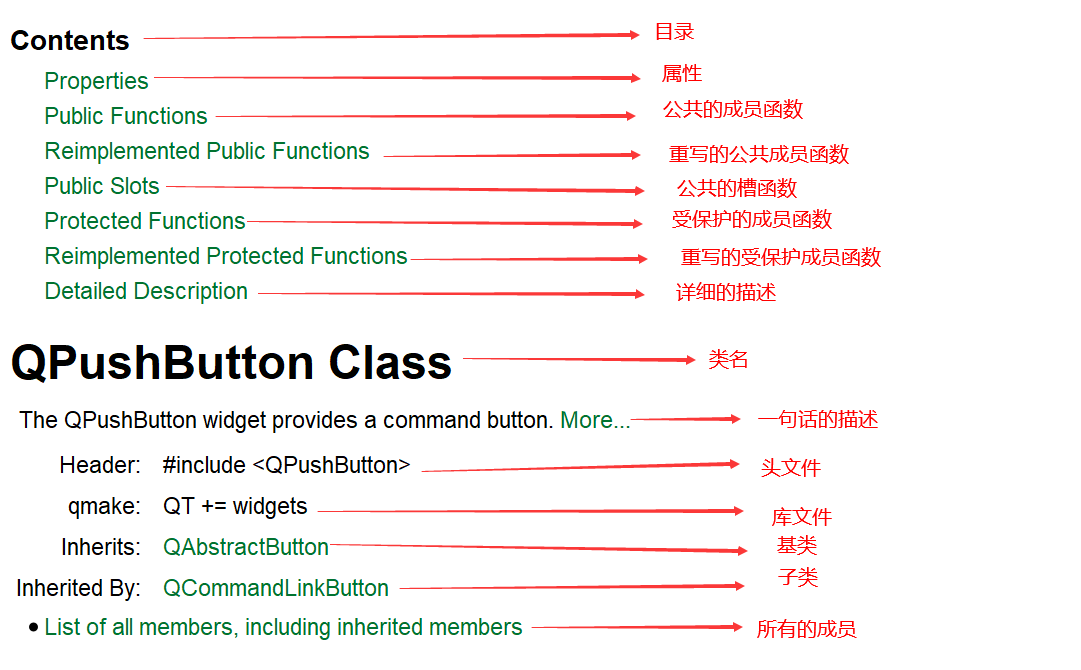
八、帮助手册的使用
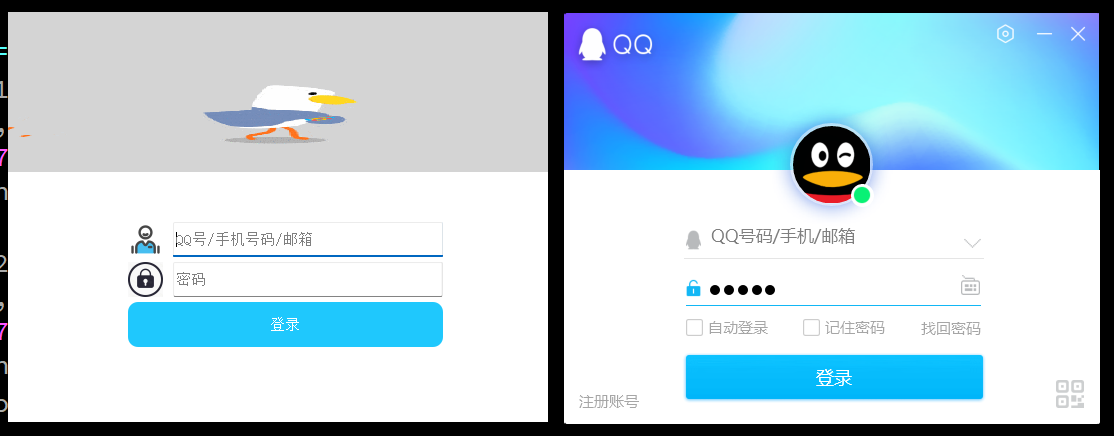
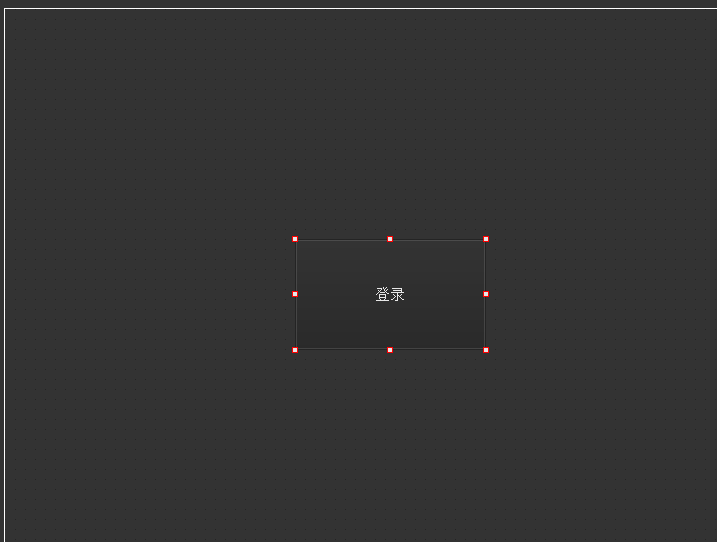
登录界面
1 2 3 4 5 6 7 8 9 10 11 12 13 14 15 16 17 18 19 20 21 22 23 24 25 26 27 28 29 30 31 32 33 34 35 36 37 38 39 40 41 42 43 44 45 46 47 48 49 50 51 52 53 54 55 56 57 58 59 60 61 62 63 64 65 66 67 68 69 70 71 72 73 74 75 76 77 78 79 80 81 82 83 84 85 86 87 #include "widget.h" Widget::Widget (QWidget *parent) : QWidget (parent) { this ->setWindowTitle ("QQ快聊" ); this ->setWindowIcon (QIcon ("C:\\Users\\admin\\Desktop\\pictrue\\qq.png" )); this ->setWindowFlag (Qt::FramelessWindowHint); this ->resize (540 ,410 ); this ->setStyleSheet ("background-color:white" ); QLabel *lab1 = new QLabel (this ); lab1->resize (540 ,160 ); lab1->setStyleSheet ("background-color:green" ); QMovie *mv = new QMovie ("C:\\Users\\admin\\Desktop\\pictrue\\qq.gif" ); mv->setParent (this ); lab1->setMovie (mv); mv->start (); lab1->setScaledContents (true ); QLabel *lab2 = new QLabel (this ); lab2->resize (35 ,35 ); lab2->move (120 ,210 ); lab2->setPixmap (QPixmap ("C:\\Users\\admin\\Desktop\\pictrue\\wodepeizhenshi.png" )); lab2->setScaledContents (true ); QLabel *lab3 = new QLabel (this ); lab3->resize (35 ,35 ); lab3->move (120 ,250 ); lab3->setPixmap (QPixmap ("C:\\Users\\admin\\Desktop\\pictrue\\passwd.jpg" )); lab3->setScaledContents (true ); QLineEdit *edit1 = new QLineEdit (this ); edit1->move (165 ,210 ); edit1->resize (270 ,35 ); edit1->setPlaceholderText ("QQ号/手机号码/邮箱" ); QLineEdit *edit2 = new QLineEdit (this ); edit2->move (165 ,250 ); edit2->resize (270 ,35 ); edit2->setPlaceholderText ("密码" ); edit2->setEchoMode (QLineEdit::Password); QPushButton *btn = new QPushButton ("登录" ,this ); btn->move (120 ,290 ); btn->resize (315 ,45 ); btn->setStyleSheet ("background-color:rgb(31,200,253);color:white;border-radius:10px" ); } Widget::~Widget () { }
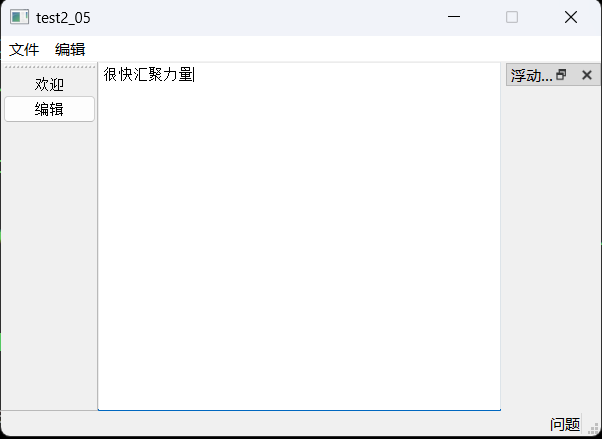
九、QMainWindow中常用的类
继承于QMainWindow类,原因该类提供了QWidget没有提供的成员函数。
菜单栏、工具栏、状态栏、浮动窗口(铆接部件)、核心部件
1 2 3 4 5 6 7 8 9 10 11 12 13 14 15 16 17 18 19 20 21 22 MainWindow::MainWindow (QWidget *parent) : QMainWindow (parent) { this ->resize (600 ,400 ); this ->setFixedSize (600 ,400 ); QMenuBar *mbar = menuBar (); this ->setMenuBar (mbar); QMenu *file = mbar->addMenu ("文件" ); QMenu *edit = mbar->addMenu ("编辑" ); file->addAction ("新建" ); file->addSeparator (); file->addAction ("打开" ); }
1 2 3 4 5 6 7 8 9 10 11 12 13 14 15 16 17 18 19 QToolBar *tbar = new QToolBar (this ); this ->addToolBar (Qt::LeftToolBarArea,tbar);tbar->setAllowedAreas (Qt::LeftToolBarArea | Qt::RightToolBarArea); tbar->setFloatable (false ); tbar->addAction ("欢迎" ); QPushButton *btn = new QPushButton (this ); btn->setText ("编辑" ); tbar->addWidget (btn);
9.3 状态栏 QStatusBar
1 2 3 4 5 6 7 8 9 10 11 //创建状态栏 QStatusBar 最多只能有一个 QStatusBar *sbar = statusBar(); //将状态栏放入窗口中 this->setStatusBar(sbar); //实例化一个标签 QLabel *lab = new QLabel("问题",this); //将标签放入状态栏中 //sbar->addWidget(lab);//默认从左边显示 sbar->addPermanentWidget(lab); //默认从右边显示
1 2 3 4 5 6 7 8 9 10 11 12 QDockWidget *dock = new QDockWidget ("浮动窗口" ,this ); this ->addDockWidget (Qt::BottomDockWidgetArea,dock);dock->setAllowedAreas (Qt::LeftDockWidgetArea | Qt::RightDockWidgetArea); QTextEdit *text_edit = new QTextEdit (this ); this ->setCentralWidget (text_edit);
十、ui界面文件
1> ui界面文件是在项目工程文件的Forms文件夹下(XXX.ui)
2> ui界面上可以通过ui指针访问到ui界面上的所有组件。
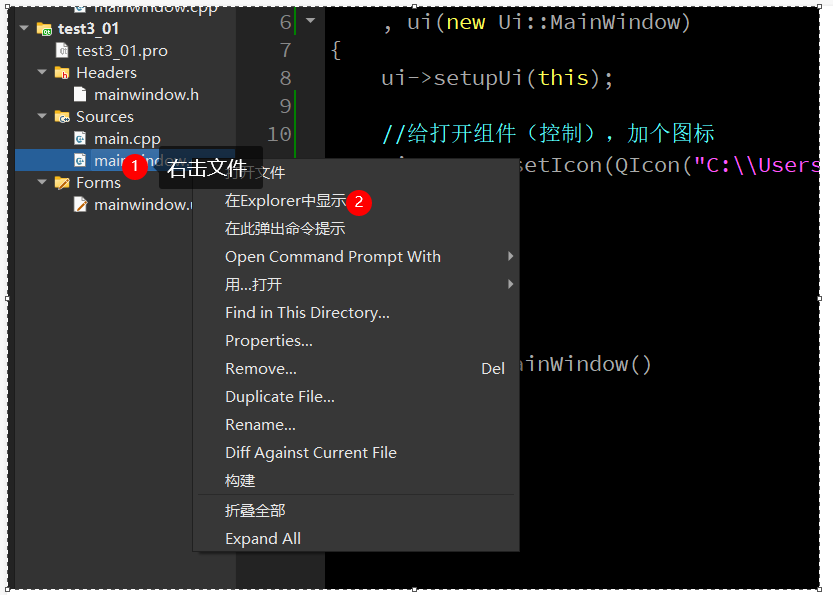
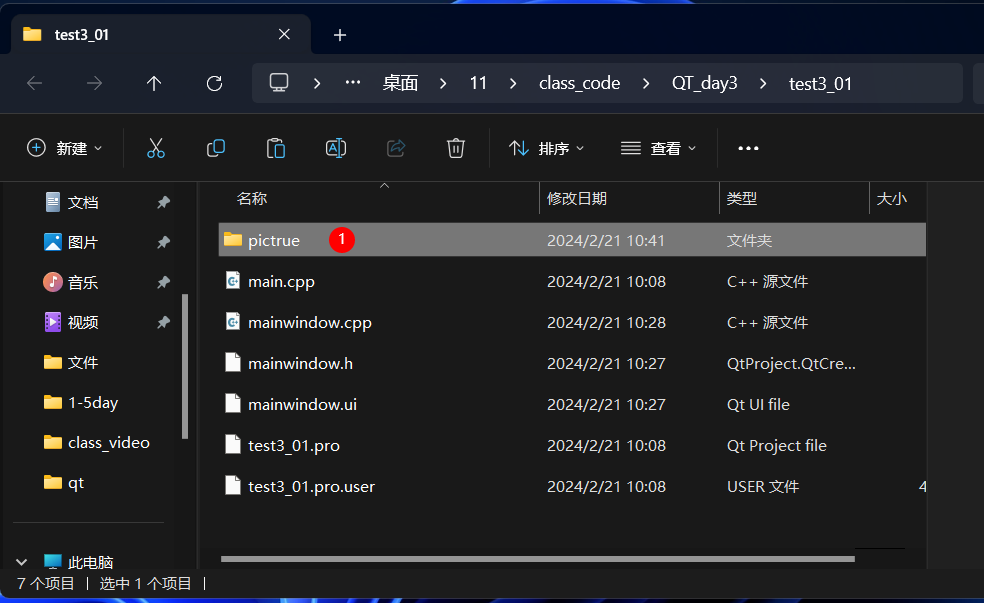
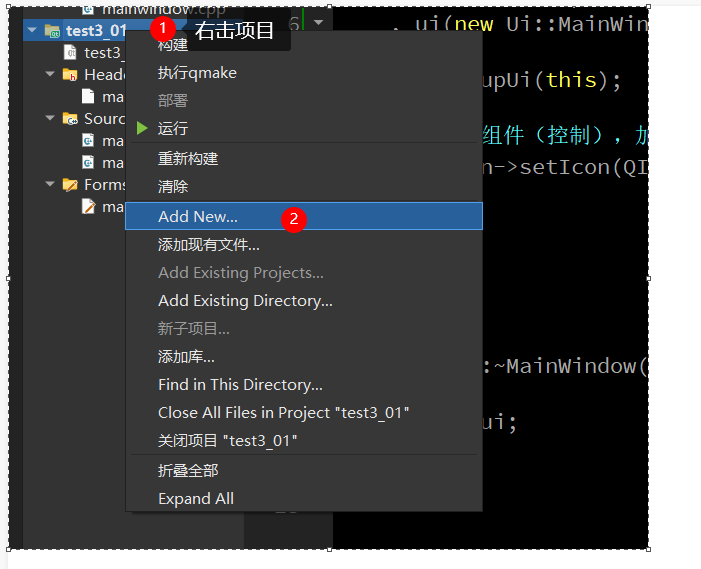
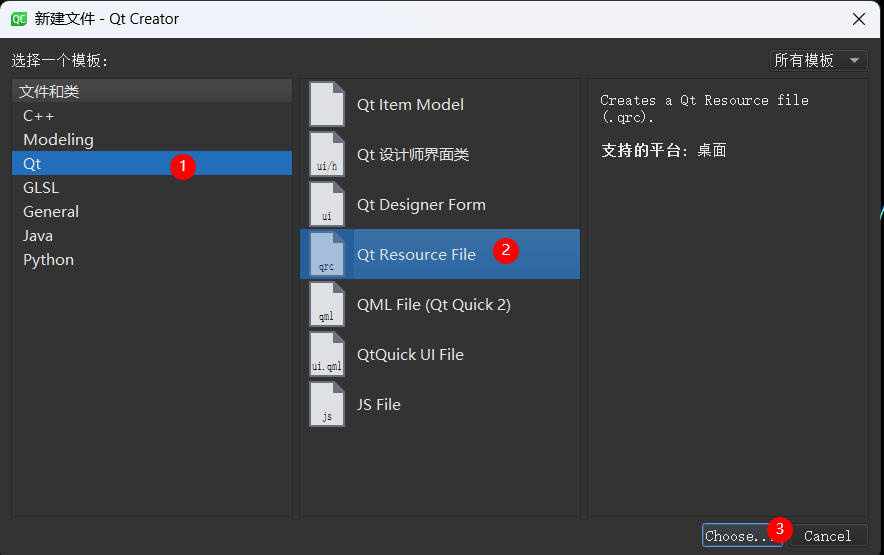
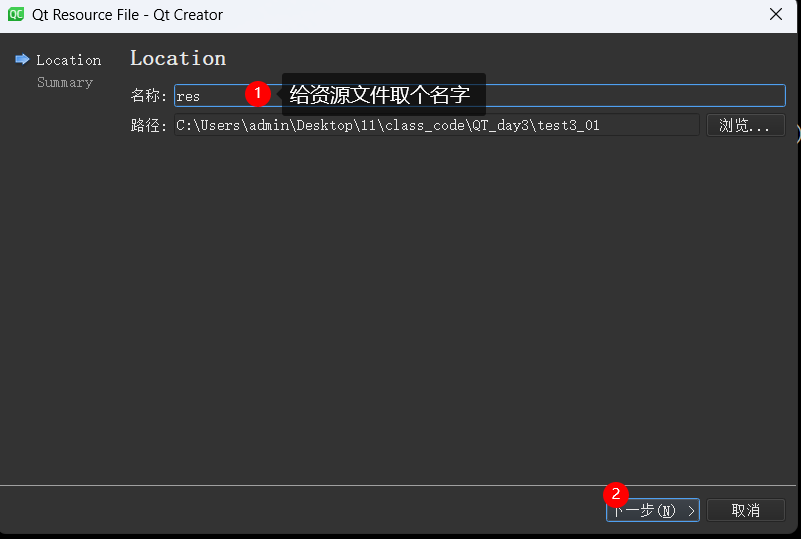
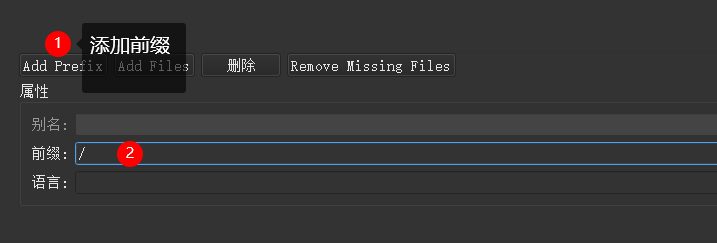
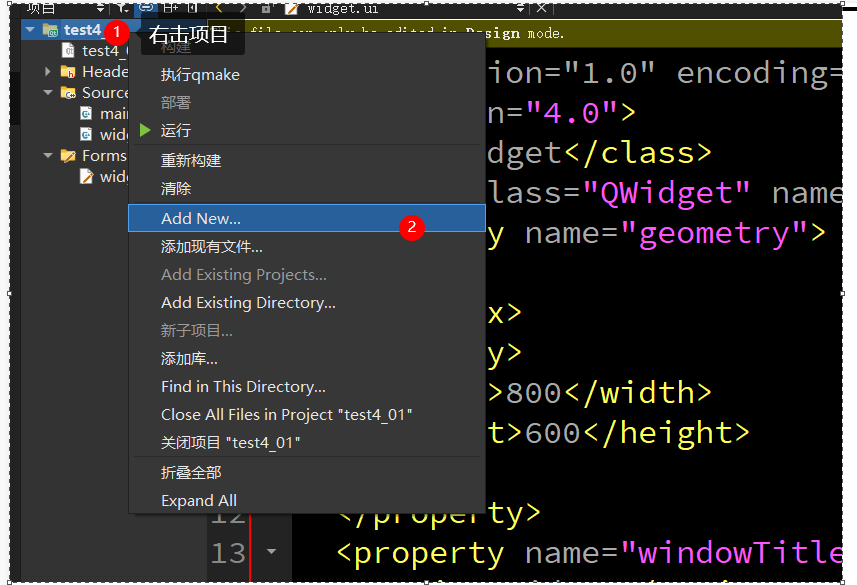
十一、资源文件的添加
1> 目的
考虑项目的兼容性,将自己发布的软件或者将项目拷贝给别人,能够保证项目可以正常运行起来。
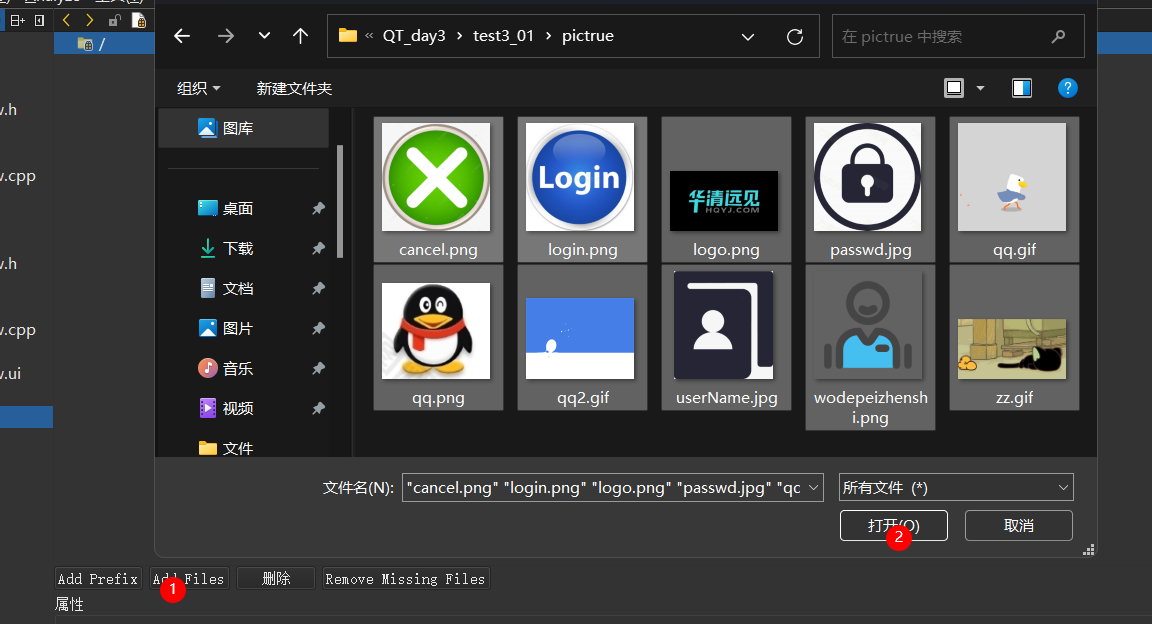
2> 资源文件添加的步骤:
1> 将资源文件放入项目中
2> 给qt项目增加一个资源文件,存放资源
3> 锤子锤一下(编译)
使用ui界面,升级优化登录界面
十二、信号与槽
qt以引为傲的核心机制:对象树、信号与槽、事件机制
1> 信号和槽是qt的核心机制之一,可以实现多个组件之间的通信 。
2> 信号:信号函数。信号定义在类体的signals权限下,信号函数是一个不完整的函数,只需要声明,不需要实现。
3> 槽:槽函数。槽定义在类体的slots权限下,槽函数是一个完整的函数,既要有声明,也要有定义。该函数可以当成普通函数使用。
4> 任意一个组件都有系统提供的信号和槽。
12.1 带有信号和槽的类体定义
1 2 3 4 5 6 7 8 9 10 11 12 13 14 15 16 17 18 19 20 21 22 23 class Widget : public QWidget{ Q_OBJECT public : Widget (QWidget *parent = nullptr ); ~Widget (); signals: void my_signal () public slots: void my_slot () private : Ui::Widget *ui; }; #endif
12.2 信号和槽的连接方式
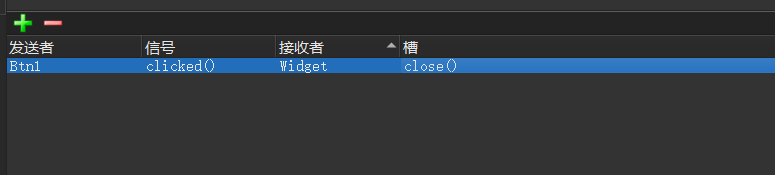
1)基于ui界面上的连接,在ui界面下的信号和槽区,将系统提供的信号和槽进行连接。
该连接,无需手动书写信号函数、槽函数、连接函数
2) 基于ui界面上的连接,在组件上,右击转到槽,选中要发射的信号,在槽函数中处理相关逻辑代码。
该连接,无需手动书写信号函数、连接函数
1 2 3 4 5 6 7 8 9 10 11 12 13 14 15 16 17 18 19 void Widget::on_Btn2_clicked () static int num = 0 ; if (num%3 == 0 ) { ui->Btn1->setStyleSheet ("background-color:red" ); } else if (num%3 == 1 ) { ui->Btn1->setStyleSheet ("background-color:green" ); } else if (num%3 == 2 ) { ui->Btn1->setStyleSheet ("background-color:yellow" ); } num++; }
3) 手动连接信号和槽,基于qt4版本的连接,该连接是不友好的连接。
需要使用connect连接函数进行连接,在QObject类中
1 2 3 4 5 6 7 8 9 10 11 12 13 14 15 16 [static ] QMetaObject::Connection QObject::connect ( const QObject *sender, const char *signal, const QObject *receiver, const char *method, ) 信号宏函数 SIGNAL () 槽宏函数 SLOT () 举个例子: QLabel *label = new QLabel; QScrollBar *scrollBar = new QScrollBar; QObject::connect (scrollBar, SIGNAL (valueChanged (int )), label, SLOT (setNum (int )));
实例:
1 2 3 4 5 6 7 8 9 10 11 12 13 14 15 16 17 18 19 20 Widget::Widget (QWidget *parent) : QWidget (parent) , ui (new Ui::Widget) { ui->setupUi (this ); Btn3 = new QPushButton ("按钮3" ,this ); Btn3->resize (ui->Btn2->width (),ui->Btn2->height ()); Btn3->move (ui->Btn2->x (),ui->Btn2->y ()+ui->Btn2->height ()+10 ); connect (Btn3,SIGNAL (clicked ()),this ,SLOT (close ())); }
4)手动连接信号和槽,基于qt5版本的连接,该连接就是友好的连接
需要使用connect连接函数进行连接,在QObject类中
1 2 3 4 5 6 7 8 9 10 11 12 13 14 [static ] QMetaObject::Connection QObject::connect ( const QObject *sender, PointerToMemberFunction signal, const QObject *receiver, PointerToMemberFunction method, ) 举个例子: QLabel *label = new QLabel; QLineEdit *lineEdit = new QLineEdit; QObject::connect (lineEdit, &QLineEdit::textChanged, label, &QLabel::setText);
实例:
头文件:
1 2 3 4 5 6 7 8 9 10 11 12 13 14 15 16 17 18 19 20 21 22 23 24 25 26 27 28 29 30 31 32 33 34 35 36 37 38 39 40 41 42 43 44 45 #ifndef WIDGET_H #define WIDGET_H #include <QWidget> #include <QPushButton> #include <QTextToSpeech> QT_BEGIN_NAMESPACE namespace Ui { class Widget ; }QT_END_NAMESPACE class Widget : public QWidget{ Q_OBJECT public : Widget (QWidget *parent = nullptr ); ~Widget (); signals: void my_signal () public slots: void my_slot () private slots: void on_Btn2_clicked () private : Ui::Widget *ui; QPushButton *Btn3; QTextToSpeech *speecher; }; #endif
源文件:
1 2 3 4 5 6 7 8 9 10 11 12 13 14 15 16 17 18 19 20 21 22 23 24 25 26 27 28 29 30 31 32 33 34 35 36 37 38 39 40 41 42 43 44 45 46 47 48 49 50 51 52 53 54 55 56 57 58 59 60 61 62 63 64 65 66 67 68 69 70 71 72 73 74 75 76 77 78 79 80 #include "widget.h" #include "ui_widget.h" Widget::Widget (QWidget *parent) : QWidget (parent) , ui (new Ui::Widget) { ui->setupUi (this ); Btn3 = new QPushButton ("按钮3" ,this ); Btn3->resize (ui->Btn2->width (),ui->Btn2->height ()); Btn3->move (ui->Btn2->x (),ui->Btn2->y ()+ui->Btn2->height ()+10 ); speecher = new QTextToSpeech (this ); connect (Btn3,SIGNAL (clicked ()),this ,SLOT (close ())); connect (ui->Btn4, &QPushButton::clicked, this , &Widget::my_slot); } void Widget::my_slot () static int num = 0 ; if (num%3 == 0 ) { speecher->say (ui->Btn1->text ()); } else if (num%3 == 1 ) { speecher->say (ui->Btn2->text ()); } else if (num%3 == 2 ) { speecher->say (Btn3->text ()); } num++; } void Widget::on_Btn2_clicked () static int num = 0 ; if (num%3 == 0 ) { ui->Btn1->setStyleSheet ("background-color:red" ); } else if (num%3 == 1 ) { ui->Btn1->setStyleSheet ("background-color:green" ); } else if (num%3 == 2 ) { ui->Btn1->setStyleSheet ("background-color:yellow" ); } num++; } Widget::~Widget () { delete ui; }
5) 手动连接信号和功能函数,如果信号一旦被触发,则自动执行功能函数中的内容。
功能函数:全局函数、lambda表达式
1 2 3 4 5 6 7 8 9 10 11 12 13 14 15 16 17 18 19 20 [static ] QMetaObject::Connection QObject::connect ( const QObject *sender, PointerToMemberFunction signal, Functor functor ) 举个例子: 全局函数: void someFunction () ; QPushButton *button = new QPushButton; QObject::connect (button, &QPushButton::clicked, someFunction); lambda表达式: QByteArray page = ...; QTcpSocket *socket = new QTcpSocket; socket->connectToHost ("qt-project.org" , 80 ); QObject::connect (socket, &QTcpSocket::connected, [=] () { socket->write ("GET " + page + "\r\n" ); });
案例:
1 2 3 4 connect (ui->Btn5, &QPushButton::clicked,[&](){ ui->Btn5->setText ("aaa" ); });
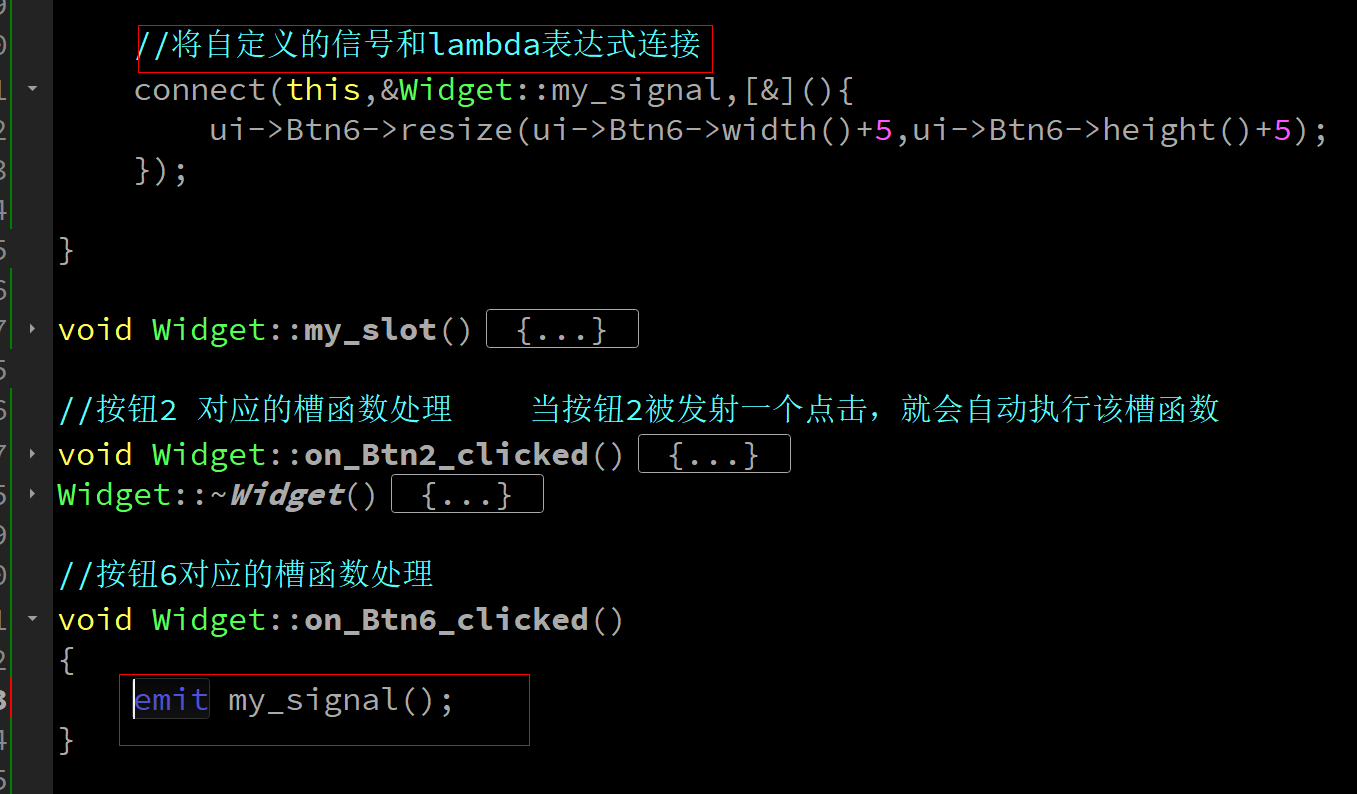
12.3 自定义的信号
自定义的信号,定义在signals权限下,是一个不完整的函数,只要声明,不要实现。
自定义 的信号,需要手动触发,使用emit关键字 进行发射信号,如果自定义的信号一旦被发射,则会自动执行对应的槽函数处理
12.4 断开连接
disconnect()和connect()函数的参数一样
12.5 小结
1> 一个信号可以连接多个槽
2> 一个槽函数可以连接多个信号
3> 信号的参数类型和槽函数参数类型必须保持一致
4> 信号的参数个数>=槽函数的参数个数
5> 信号可以连接信号
1 2 3 4 5 6 7 8 9 10 11 12 13 1 、信号函数和槽函数进行链接时,一般要求信号函数和槽函数的参数保持一致 connect (信号发送者, SIGNAL (signalFun ()),信号接收者, SLOT (slotFun ())); connect (信号发送者, SIGNAL (signalFun (int )),信号接收者, SLOT (slotFun (int ))); connect (信号发送者, SIGNAL (signalFun (int , char )),信号接收者, SLOT (slotFun (int , char ))); connect (信号发送者, SIGNAL (signalFun (char , int )),信号接收者, SLOT (slotFun (int , char ))); connect (信号发送者, SIGNAL (signalFun (int )),信号接收者, SLOT (slotFun (char ))); 2 、当信号函数的参数大于槽函数的参数时 connect (信号发送者, SIGNAL (signalFun (int , char )),信号接收者, SLOT (slotFun ())); connect (信号发送者, SIGNAL (signalFun (int , char )),信号接收者, SLOT (slotFun (int ))); connect (信号发送者, SIGNAL (signalFun (int , char )),信号接收者, SLOT (slotFun (char ))); 3 、当信号函数的参数小于槽函数的参数时 connect (信号发送者, SIGNAL (signalFun (int )),信号接收者, SLOT (slotFun (int , char ))); connect (信号发送者, SIGNAL (signalFun (int )),信号接收者, SLOT (slotFun (int , char =0 )));
十三、使用信号和槽实现多个界面跳转
1> 准备两个界面
2> 第一个界面准备signal
3> 第二个界面准备slot
4> 将第一个界面的信号和槽进行连接
实例:
第一个界面的ui
头文件:
1 2 3 4 5 6 7 8 9 10 11 12 13 14 15 16 17 18 19 20 21 22 23 24 25 26 27 28 29 30 31 32 33 34 35 36 #ifndef WIDGET_H #define WIDGET_H #include <QWidget> QT_BEGIN_NAMESPACE namespace Ui { class Widget ; }QT_END_NAMESPACE class Widget : public QWidget{ Q_OBJECT public : Widget (QWidget *parent = nullptr ); ~Widget (); signals: void my_jump () private slots: void on_pushButton_clicked () private : Ui::Widget *ui; }; #endif
源文件:
1 2 3 4 5 6 7 8 9 10 11 12 13 14 15 16 17 18 19 20 21 22 23 24 25 26 #include "widget.h" #include "ui_widget.h" Widget::Widget (QWidget *parent) : QWidget (parent) , ui (new Ui::Widget) { ui->setupUi (this ); } Widget::~Widget () { delete ui; } void Widget::on_pushButton_clicked () this ->close (); emit my_jump () ; }
第二界面的ui
头文件:
1 2 3 4 5 6 7 8 9 10 11 12 13 14 15 16 17 18 19 20 21 22 23 24 25 26 27 28 29 30 31 32 33 34 #ifndef SECOND_H #define SECOND_H #include <QWidget> namespace Ui {class Second ;} class Second : public QWidget{ Q_OBJECT public : explicit Second (QWidget *parent = nullptr ) ~Second (); public slots: void my_jump_slot () private : Ui::Second *ui; }; #endif
源文件:
1 2 3 4 5 6 7 8 9 10 11 12 13 14 15 16 17 18 19 20 21 22 23 #include "second.h" #include "ui_second.h" Second::Second (QWidget *parent) : QWidget (parent), ui (new Ui::Second) { ui->setupUi (this ); } Second::~Second () { delete ui; } void Second::my_jump_slot () this ->show (); }
主函数:
1 2 3 4 5 6 7 8 9 10 11 12 13 14 15 16 17 18 19 20 21 22 23 24 25 26 27 28 29 #include "widget.h" #include "second.h" #include <QApplication> int main (int argc, char *argv[]) QApplication a (argc, argv) ; Widget w; w.show (); Second s; QObject::connect (&w,&Widget::my_jump, &s, &Second::my_jump_slot); return a.exec (); }
十四、qss登录界面升级优化
14.1概念
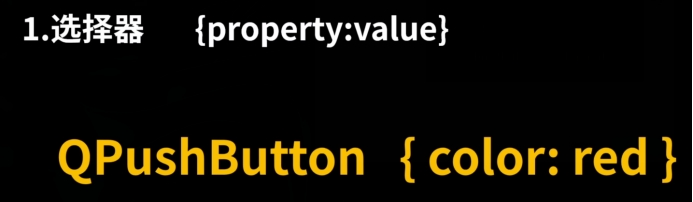
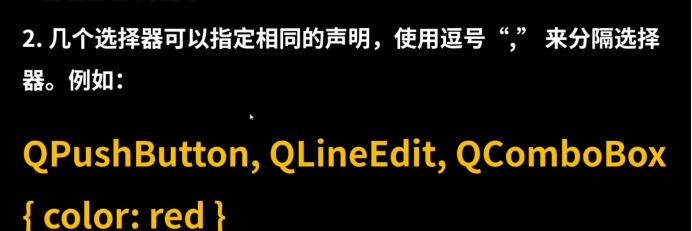
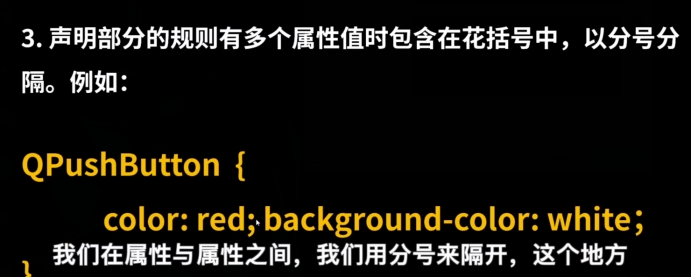
Qss是Qt程序界面中用来设置控件的背景图片、大小、字体颜色、字体类型、按钮状态变化等属性,它是用来美化UI界面。实现界面和程序的分离,快速切换界面。
优点:实现简单、便捷
14.2语法
主要函数:
十五、发布软件
1> 配置发布软件的环境变量,将qt安装路径下的bin目录放入到系统环境变量中
D:\Qt\Qt5.14.2\5.14.2\mingw73_64\bin
D:\Qt\Qt5.14.2\Tools\mingw730_64\bin
2> 在编译器中,将项目以release形式运行一次
3> 将影子目录中的可执行程序放入一个新的文件夹中
4> 在新文件夹中的空白处,按shift+右键 —>在此处打开powershell窗口
5> 输入指令:windeployqt.exe 可执行程序名.exe即可完成发布工作
如果想将快捷方式的图标进行修改,则需要将将一张图片用画图另存为BMP格式,再将该BMP图片重命名为ico类型的图片。
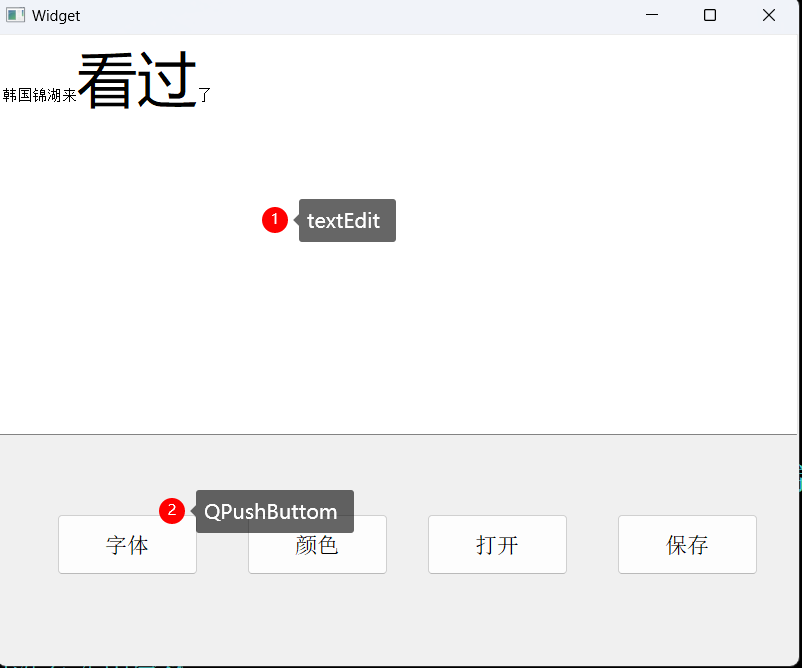
十六、对话框
对话框的种类:消息对话框、字体对话框、颜色对话框、文件对话框
16.1 消息对话框 QMessageBox
该类给用户提供了一种交互式的弹窗,提供了两种实现版本,分别是基于属性版本和基于静态成员函数版本。
消息对话框种类: 警告对话框、问题对话框、信息对话框、错误对话框
16.1.1 基于属性版本
1 2 3 4 5 6 7 8 9 10 11 12 13 14 15 16 17 18 19 20 21 22 23 24 25 26 27 28 29 30 31 32 33 34 35 36 需要用这样的类 实例化对象 用该对象调用成员函数进行相关设置 需要调用exec ()函数 弹出对话框 举个例子: QMessageBox msgBox; msgBox.setText ("The document has been modified." ); msgBox.setInformativeText ("Do you want to save your changes?" ); msgBox.setStandardButtons (QMessageBox::Save | QMessageBox::Discard | QMessageBox::Cancel); msgBox.setDefaultButton (QMessageBox::Save); int ret = msgBox.exec (); 有参构造函数: QMessageBox::QMessageBox ( QMessageBox::Icon icon, const QString &title, const QString &text, QMessageBox::StandardButtons buttons = NoButton, QWidget *parent = nullptr , ) 参数1 : QMessageBox::NoIcon QMessageBox::Question QMessageBox::Information QMessageBox::Warning QMessageBox::Critical 参数3 : QMessageBox::Ok QMessageBox::Open QMessageBox::Save QMessageBox::Cancel QMessageBox::Close QMessageBox::Discard
案例:
1 2 3 4 5 6 7 8 9 10 11 12 13 14 15 16 17 18 19 20 21 22 23 24 25 26 27 28 void Widget::on_warBtn_clicked () QMessageBox msg ( QMessageBox::Warning, "警告" , "放学后,你等着" , QMessageBox::Yes | QMessageBox::No, this ) int ret = msg.exec (); if (ret == QMessageBox::Yes) { qDebug () << "等着就等着,谁怕谁" ; } else { qDebug () << "这是干啥呀,你永远是我大哥" ; } }
16.1.2 基于静态成员函数版本
1 2 3 4 5 6 7 8 9 10 11 12 13 14 不需要实例化对象,直接使用类调用静态成员函数弹出对话框 该类给用户提供了四种静态成员函数:warning、question、information、critical 无需调用exec () 以question为例: [static ] QMessageBox::StandardButton QMessageBox::question ( QWidget *parent, const QString &title, const QString &text, QMessageBox::StandardButtons buttons = StandardButtons (Yes | No), )
案例:
1 2 3 4 5 6 7 8 9 10 11 12 13 14 15 16 17 18 19 20 21 22 void Widget::on_quesBtn_clicked () int ret = QMessageBox::question (this , "问题" , "同学们,你们饿吗?" , QMessageBox::Yes | QMessageBox::No); if (ret == QMessageBox::Yes) { qDebug () << "好饿,赶紧下课,干饭干饭" ; } else { qDebug () << "我爱学习,饿是什么" ; } }
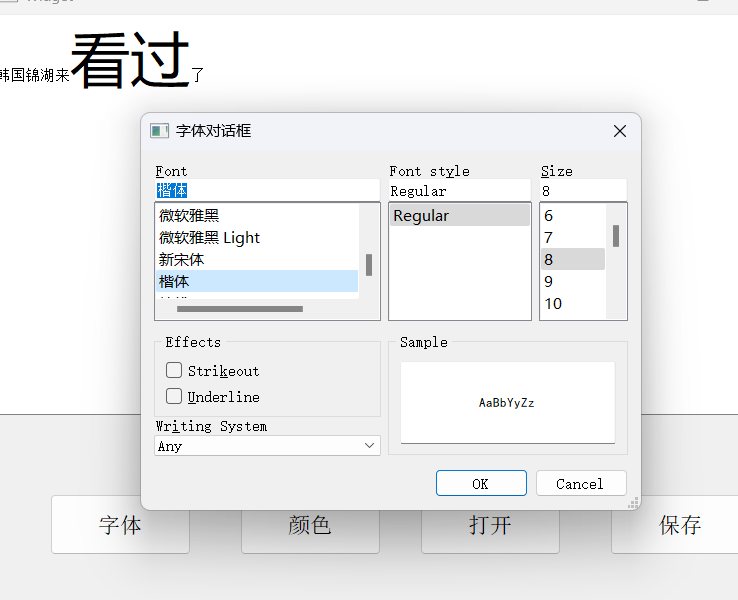
16.2 字体对话框 QFontDialog
该类给用户提供了一个字体对话框,直接调用该类的一个静态成员函数getFont()即可弹出字体对话框。
1 2 3 4 5 6 7 8 9 10 11 12 [static ] QFont QFontDialog::getFont ( bool *ok, const QFont &initial, QWidget *parent = nullptr , const QString &title = QString (), ) 参数2 : QFont::QFont (const QString &family, int pointSize = -1 , int weight = -1 , bool italic = false ) 弹出字体对话框所需要的类: QFontDialog、QFont
案例:文本编辑器
头文件:
1 2 3 4 5 6 7 8 9 10 11 12 13 14 15 16 17 18 19 20 21 22 23 24 25 26 27 28 29 30 31 32 33 34 35 #ifndef WIDGET_H #define WIDGET_H #include <QWidget> #include <QFontDialog> #include <QFont> #include <QMessageBox> QT_BEGIN_NAMESPACE namespace Ui { class Widget ; }QT_END_NAMESPACE class Widget : public QWidget{ Q_OBJECT public : Widget (QWidget *parent = nullptr ); ~Widget (); private slots: void on_fontBtn_clicked () private : Ui::Widget *ui; }; #endif
源文件:
1 2 3 4 5 6 7 8 9 10 11 12 13 14 15 16 17 18 19 20 21 22 23 24 25 26 27 28 29 30 31 32 33 34 35 36 37 38 39 40 41 42 43 44 45 46 47 48 49 50 #include "widget.h" #include "ui_widget.h" Widget::Widget (QWidget *parent) : QWidget (parent) , ui (new Ui::Widget) { ui->setupUi (this ); } Widget::~Widget () { delete ui; } void Widget::on_fontBtn_clicked () bool ok; QFont f = QFontDialog::getFont ( &ok, QFont ("楷体" ,8 ,10 ), this , "字体对话框" ); if (ok) { ui->textEdit->setCurrentFont (f); } else { QMessageBox::information (this ,"" ,"你没有选中字体" ); }
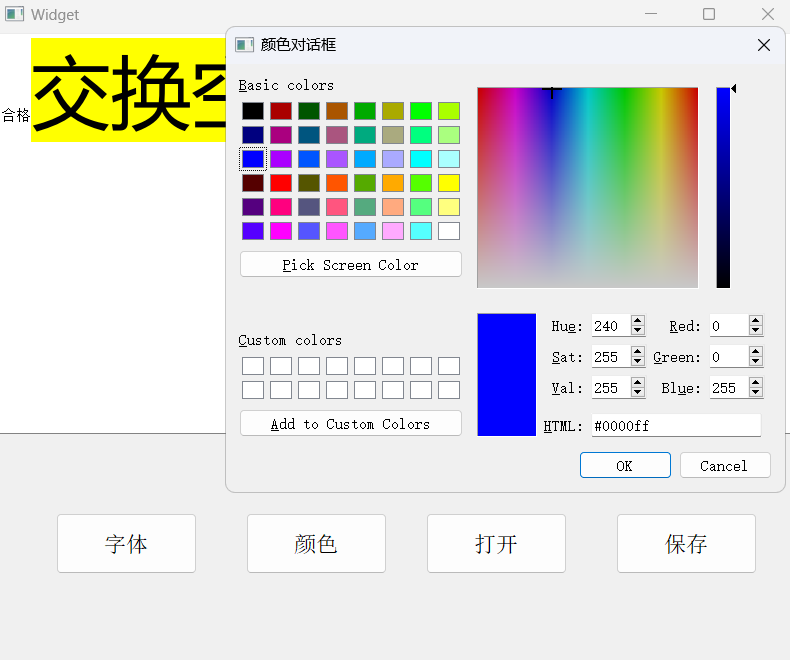
16.3 颜色对话框 QColorDialog
该类给用户提供了一个颜色对话框,直接调用该类的一个静态成员函数getColor()即可直接弹出颜色对话框。
1 2 3 4 5 6 7 8 9 10 11 12 13 14 15 16 17 [static ] QColor QColorDialog::getColor ( const QColor &initial = Qt::white, QWidget *parent = nullptr , const QString &title = QString (), ) 弹出颜色对话框需要的类:QColorDialog、QColor 参数1 : QColor::QColor (int r, int g, int b, int a = ...) 通过isValid ()判断用户是否选中颜色 如果选中颜色返回true ,否则false bool QColor::isValid () const Returns true if the color is valid ; otherwise returns false .
案例:
头文件:
1 2 3 4 5 6 7 8 9 10 11 12 13 14 15 16 17 18 19 20 21 22 23 24 25 26 27 28 29 30 31 32 33 34 35 36 37 38 39 40 #ifndef WIDGET_H #define WIDGET_H #include <QWidget> #include <QFontDialog> #include <QFont> #include <QMessageBox> #include <QColorDialog> #include <QColor> QT_BEGIN_NAMESPACE namespace Ui { class Widget ; }QT_END_NAMESPACE class Widget : public QWidget{ Q_OBJECT public : Widget (QWidget *parent = nullptr ); ~Widget (); private slots: void on_fontBtn_clicked () void on_colorBtn_clicked () private : Ui::Widget *ui; }; #endif
源文件:
1 2 3 4 5 6 7 8 9 10 11 12 13 14 15 16 17 18 19 20 21 22 23 24 25 26 void Widget::on_colorBtn_clicked () QColor c = QColorDialog::getColor (QColor (0 ,0 ,255 ), this , "颜色对话框" ); if (c.isValid ()) { ui->textEdit->setTextBackgroundColor (c); } else { QMessageBox::information (this ,"" ,"你没有选中颜色" ); } }
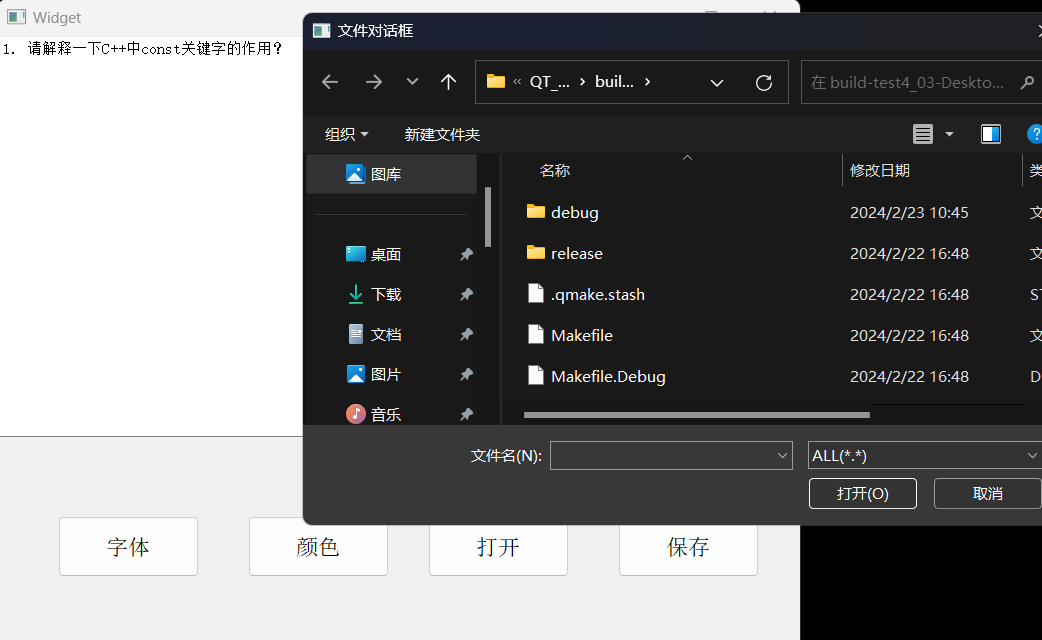
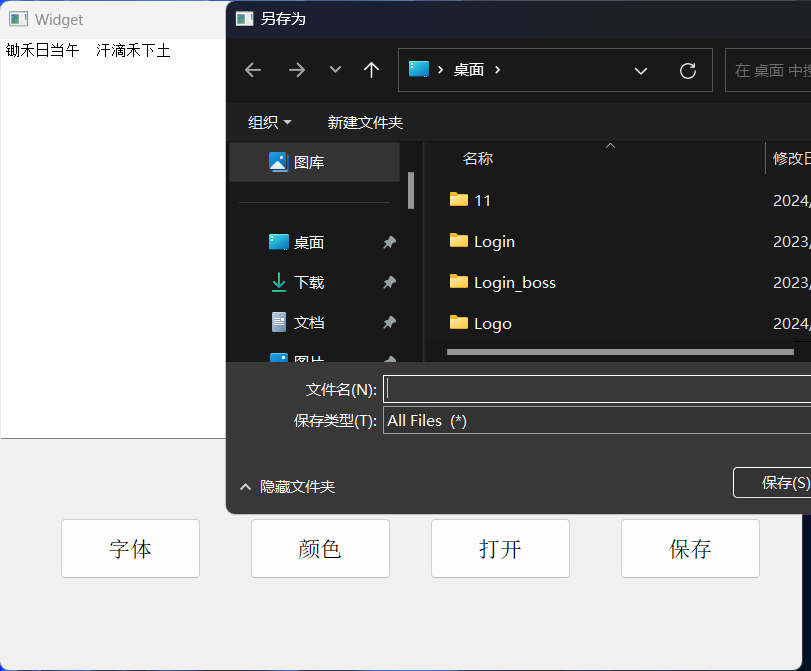
16.4 文件对话框 QFileDialog
该类给用户提供了一个文件对话框,可以获取文件路径 ,可以直接调用该类里的两个静态成员函数弹出文件对话框,分别是getOpenFileName()、getSaveFileName()。
getOpenFileName()
1 2 3 4 5 6 7 8 9 10 11 12 13 14 15 16 [static ] QString QFileDialog::getOpenFileName ( QWidget *parent = nullptr , const QString &caption = QString (), const QString &dir = QString (), const QString &filter = QString (), QString *selectedFilter = nullptr , ) 举个例子: QString fileName = QFileDialog::getOpenFileName (this , tr ("Open File" ), "/home" , tr ("Images (*.png *.xpm *.jpg)" )); "Images (*.png *.xpm *.jpg);;Text files (*.txt);;XML files (*.xml)"
案例:
头文件:
1 2 3 4 5 6 7 8 9 10 11 12 13 14 15 16 17 18 19 20 21 22 23 24 25 26 27 28 29 30 31 32 33 34 35 36 37 38 39 40 41 42 43 44 45 46 #ifndef WIDGET_H #define WIDGET_H #include <QWidget> #include <QFontDialog> #include <QFont> #include <QMessageBox> #include <QColorDialog> #include <QColor> #include <QFileDialog> #include <QDebug> #include <QFile> QT_BEGIN_NAMESPACE namespace Ui { class Widget ; }QT_END_NAMESPACE class Widget : public QWidget{ Q_OBJECT public : Widget (QWidget *parent = nullptr ); ~Widget (); private slots: void on_fontBtn_clicked () void on_colorBtn_clicked () void on_openBtn_clicked () private : Ui::Widget *ui; }; #endif
源文件:
1 2 3 4 5 6 7 8 9 10 11 12 13 14 15 16 17 18 19 20 21 22 23 24 25 26 27 28 29 30 31 32 33 34 void Widget::on_openBtn_clicked () QString fileName = QFileDialog::getOpenFileName (this , "文件对话框" , "./" , "ALL(*.*);;Image(*.png *.jpg);;文本(*.txt)" ); qDebug () << fileName ; QFile file (fileName) ; file.open (QFile::ReadWrite); QByteArray msg = file.readAll (); ui->textEdit->setText (msg); file.close (); }
getSaveFileName()
1 2 3 4 5 6 7 8 [static ] QString QFileDialog::getSaveFileName ( QWidget *parent = nullptr , const QString &caption = QString(), const QString &dir = QString(), const QString &filter = QString(), QString *selectedFilter = nullptr , QFileDialog::Options options = Options())
案例:
源文件:
1 2 3 4 5 6 7 8 9 10 11 12 13 14 15 16 17 18 19 20 21 22 23 void Widget::on_saveBtn_clicked () QString fileName = QFileDialog::getSaveFileName (); QString msg = ui->textEdit->toPlainText (); QFile file (fileName) ; file.open (QFile::WriteOnly); file.write (msg.toLocal8Bit ()); file.close (); }
16.5 Qt中文件读写 QFile
1> 用QFile类实例化一个对象,实例化对象时给个路径
2> 使用open()打开文件, 打开方式有读写
3> 使用write()写入数据,调用read()、readLine()、readAll()读取数据
4> close()关闭文件
十七、事件机制
引以为傲的核心机制之一。
17.1概念
当这件事情发生时,自动执行某块功能代码,该某块功能代码都是系统提供的虚函数,我们只需要将该虚函数重写即可。
17.2事件处理简介
1 2 3 4 5 6 7 8 9 10 11 12 13 14 15 16 17 18 19 20 21 22 23 24 25 26 27 28 29 30 31 32 33 34 35 36 1. 什么是事件? (重点) 事件是由窗口系统或者自身产生的,用以响应所发生的各类事情,比如用户按下并释放了键盘或者鼠标、窗口因暴露而需要重绘、定时器到时而应有所动作,等等 从某种意义上讲,事件比信号更原始,甚至可以认为大多数信号其实都是由事件产生的。比如一个下压式按钮首先感受到的是鼠标事件, 在进行必要的处理以产生按钮下沉继而弹起的视觉效果之后,才会发射 clicked()信号 2. 如何处理事件? (重点) myWnd(自定义类) -继承-> QWidget -继承-> QObject 1> 当事件发生时,首先被调用的是QObject类中的虚函数event(), 其 QEvent型参数标识了具体的事件类型 bool QObject:: event (QEvent* e) { if (e == mouseEvent) { void QWidget::mousePressEvent (QMouseEvent* e) void QWidget:: mouseReleaseEvent (QMouseEvent* e) } if(e == keyEvent){ void QWidget::keyPressEvent (QMouseEvent* e) void QWidget:: keyReleaseEvent (QMouseEvent* e) } } 2> 作为QObject类的子类, QWidget类覆盖了其基类中的 event()虚函数,并根据具体事件调用具体事件处理函数 void QWidget::mousePressEvent (QMouseEvent* e) void QWidget::mouseReleaseEvent (QMouseEvent* e) void QWidget::keyPressEvent (QMouseEvent* e) void QWidget:: keyReleaseEvent (QMouseEvent* e) void QWidget::paintEvent (QPaintEvent* e): 3> 而这些事件处理函数同样也是虚函数,也可以被 QWidget类 的子类覆盖,以提供针对不同窗口部件类型的事件处理 4> 组件的使用者所关心的往往是定义什么样的槽处理什么样的信号, 而组件的实现者更关心覆盖哪些事件处理函数
17.3 事件处理函数由来
1 2 3 4 5 6 7 8 9 10 11 12 13 14 15 16 17 18 19 20 21 22 23 24 QObject类 提供了那些可以重写的虚函数 [virtual] bool QObject::event(QEvent *e) // 参数:事件的类型 QWidgets类, 提供了那些可以重写的虚函数 [override virtual protected] bool QWidget::event(QEvent *event) [virtual protected] void QWidget::keyPressEvent(QKeyEvent *event) [virtual protected] void QWidget::keyReleaseEvent(QKeyEvent *event) [virtual protected] void QWidget::mouseMoveEvent(QMouseEvent *event) [virtual protected] void QWidget::mousePressEvent(QMouseEvent *event) [virtual protected] void QWidget::mouseReleaseEvent(QMouseEvent *event) [virtual protected] void QWidget::mouseDoubleClickEvent(QMouseEvent *event) [virtual protected] void QObject::timerEvent(QTimerEvent *event) QPainter类 ---> 画家类 void SimpleExampleWidget::paintEvent(QPaintEvent *) { QPainter painter(this); painter.setPen(Qt::blue); painter.setFont(QFont("Arial", 30)); painter.drawText(rect(), Qt::AlignCenter, "Qt"); }
十八、定时器事件 QTimerEvent
qt的定时器事件提供了两种实现版本,分别是基于属性版本、基于事件函数版本。
18.1 基于事件函数
功能: 让系统每隔一定的时间,自动执行某块功能代码 (函数)
1 2 3 4 所需要的函数: startTimer (int sec); killTimer (int id); timerEvent (QTimerEvent *e);
实例:
1 2 3 4 5 6 7 8 9 10 11 12 13 14 15 16 17 18 19 20 21 22 23 24 25 26 27 28 29 30 31 32 33 void Widget::timerEvent (QTimerEvent *e) static int num = 0 ; ui->Lab1->setNum (++num); } void Widget::on_Btn1_clicked () if (ui->Btn1->text () == "启动" ) { id = startTimer (1000 ); ui->Btn1->setText ("关闭" ); } else { killTimer (id); ui->Btn1->setText ("启动" ); } }
17.2 基于属性版本
1 2 3 4 5 需要实例化一个对象 所用到的类 QTimer 调用成员函数start(int sec),给定毫秒数,每隔一定时间,自动触发timeout()信号 我们就可以将该信号连接到自定义的槽函数中,在槽函数中处理逻辑代码。 调用成员函数stop(),断开信号和槽的连接。
1 2 3 4 5 6 7 8 9 10 11 12 13 14 15 16 17 18 19 20 21 22 23 24 25 26 27 28 29 30 31 32 33 34 35 36 37 38 39 40 41 42 43 44 45 46 47 48 49 50 51 52 53 54 55 56 57 58 59 60 61 62 63 64 65 66 67 68 69 70 71 72 73 74 75 76 77 78 79 80 81 82 83 84 85 86 87 88 89 90 91 92 93 94 95 96 97 98 99 100 101 102 103 104 105 106 107 108 109 110 111 112 113 114 115 116 117 118 119 120 121 122 123 124 125 126 127 128 129 130 131 132 133 134 135 136 #include "widget.h" #include "ui_widget.h" Widget::Widget (QWidget *parent) : QWidget (parent) , ui (new Ui::Widget) { ui->setupUi (this ); timer = new QTimer (this ); connect (timer, &QTimer::timeout, this , &Widget::timeout_slot); } Widget::~Widget () { delete ui; } void Widget::timerEvent (QTimerEvent *e) if (e->timerId () == id) { QTime sys_time = QTime::currentTime (); QString t = sys_time.toString ("hh::mm::ss" ); ui->Lab1->setText (t); ui->Lab1->setAlignment (Qt::AlignCenter); } } void Widget::on_Btn1_clicked () if (ui->Btn1->text () == "启动" ) { id = startTimer (1000 ); ui->Btn1->setText ("关闭" ); } else { killTimer (id); ui->Btn1->setText ("启动" ); } } void Widget::on_Btn1_2_clicked () if (ui->Btn1_2->text () == "启动" ) { timer->start (1000 ); ui->Btn1_2->setText ("关闭" ); } else { timer->stop (); ui->Btn1_2->setText ("启动" ); } } void Widget::timeout_slot () QTime sys_time = QTime::currentTime (); QString t = sys_time.toString ("hh::mm::ss" ); ui->Lab1_2->setText (t); ui->Lab1_2->setAlignment (Qt::AlignCenter); }
十九、键盘事件 QKeyEvent
19.1 功能
当程序员使用键盘时(按下、抬起)时,自动执行某块功能代码。
19.2 重写的函数
1 2 [virtual protected ] void QWidget::keyPressEvent (QKeyEvent *event) [virtual protected ] void QWidget::keyReleaseEvent (QKeyEvent *event)
19.3 QKeyEvent常用的函数
1 2 key () ----->键盘上对应的键值text () ------>键盘上对应的文本(eg:有大小写字母)
案例:
头文件:
1 2 3 4 5 6 7 8 9 10 11 12 13 14 15 16 17 18 19 20 21 22 23 24 25 26 27 28 29 30 31 #ifndef WIDGET_H #define WIDGET_H #include <QWidget> #include <QKeyEvent> QT_BEGIN_NAMESPACE namespace Ui { class Widget ; }QT_END_NAMESPACE class Widget : public QWidget{ Q_OBJECT public : Widget (QWidget *parent = nullptr ); ~Widget (); void keyPressEvent (QKeyEvent *event) override void keyReleaseEvent (QKeyEvent *event) override private : Ui::Widget *ui; }; #endif
源文件:
1 2 3 4 5 6 7 8 9 10 11 12 13 14 15 16 17 18 19 20 21 22 23 24 25 26 27 28 29 30 31 32 33 34 35 36 37 38 39 40 41 42 43 44 45 46 47 48 49 50 51 52 53 54 #include "widget.h" #include "ui_widget.h" Widget::Widget (QWidget *parent) : QWidget (parent) , ui (new Ui::Widget) { ui->setupUi (this ); } Widget::~Widget () { delete ui; } void Widget::keyPressEvent (QKeyEvent *event) ui->label->setText (event->text ()+"被按下了" ); ui->label->setAlignment (Qt::AlignCenter); switch (event->key ()) { case 'W' : { if (ui->label->y () < 0 -ui->label->height ()) { ui->label->move (ui->label->x (),this ->height ()); } ui->label->move (ui->label->x (), ui->label->y ()-10 ); } } } void Widget::keyReleaseEvent (QKeyEvent *event) ui->label->setText (event->text ()+"被抬起了" ); ui->label->setAlignment (Qt::AlignCenter); }
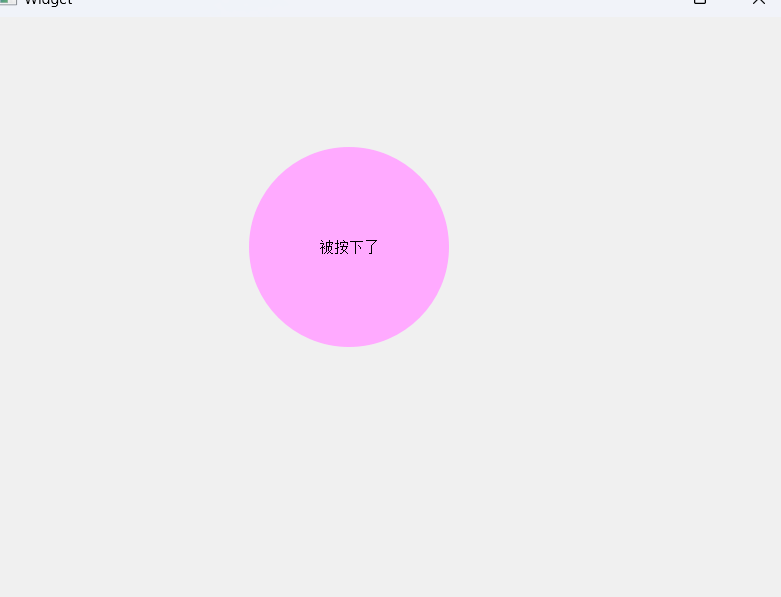
二十、鼠标事件 QMouseEvent
20.1 功能
当程序员使用鼠标时,自动执行某块功能代码。
20.2 重写函数的种类
1 2 3 4 [virtual protected ] void QWidget::mouseDoubleClickEvent (QMouseEvent *event) [virtual protected ] void QWidget::mouseMoveEvent (QMouseEvent *event) [virtual protected ] void QWidget::mousePressEvent (QMouseEvent *event) [virtual protected ] void QWidget::mouseReleaseEvent (QMouseEvent *event)
20.3 QMouseEvent常用的函数1 2 3 4 5 6 7 8 9 10 11 12 13 Qt::MouseButton button () const ---->判断鼠标哪个键被按下 Qt::MouseButtons buttons () const ---->对于鼠标移动是,判断鼠标哪个键被按下 x () --->x轴坐标y () --->y轴坐标 pos () --->在当前窗口的坐标点 globapos () ---->在全局窗口的坐标点
案例:
头文件:
1 2 3 4 5 6 7 8 9 10 11 12 13 14 15 16 17 18 19 20 21 22 23 24 25 26 27 28 29 30 31 32 33 34 35 36 37 #ifndef WIDGET_H #define WIDGET_H #include <QWidget> #include <QKeyEvent> QT_BEGIN_NAMESPACE namespace Ui { class Widget ; }QT_END_NAMESPACE class Widget : public QWidget{ Q_OBJECT public : Widget (QWidget *parent = nullptr ); ~Widget (); void keyPressEvent (QKeyEvent *event) override void keyReleaseEvent (QKeyEvent *event) override void mouseMoveEvent (QMouseEvent *event) override void mousePressEvent (QMouseEvent *event) override void mouseReleaseEvent (QMouseEvent *event) override void mouseDoubleClickEvent (QMouseEvent *event) override private : Ui::Widget *ui; }; #endif
源文件:
1 2 3 4 5 6 7 8 9 10 11 12 13 14 15 16 17 18 19 20 21 22 23 24 25 26 27 28 29 30 31 32 33 34 35 36 37 38 39 40 41 42 43 44 45 46 47 48 49 50 51 52 53 54 55 56 57 58 59 60 61 62 63 64 65 66 67 68 69 70 71 72 73 74 75 76 77 78 79 80 81 82 83 84 85 86 87 88 89 90 91 92 93 94 95 96 97 98 99 100 101 102 103 104 105 106 107 108 109 110 111 112 113 114 115 116 117 118 119 120 121 122 123 #include "widget.h" #include "ui_widget.h" Widget::Widget (QWidget *parent) : QWidget (parent) , ui (new Ui::Widget) { ui->setupUi (this ); } Widget::~Widget () { delete ui; } void Widget::keyPressEvent (QKeyEvent *event) ui->label->setText (event->text ()+"被按下了" ); ui->label->setAlignment (Qt::AlignCenter); switch (event->key ()) { case 'W' : { if (ui->label->y () < 0 -ui->label->height ()) { ui->label->move (ui->label->x (),this ->height ()); } ui->label->move (ui->label->x (), ui->label->y ()-10 ); } } } void Widget::keyReleaseEvent (QKeyEvent *event) ui->label->setText (event->text ()+"被抬起了" ); ui->label->setAlignment (Qt::AlignCenter); } void Widget::mouseMoveEvent (QMouseEvent *event) } void Widget::mousePressEvent (QMouseEvent *event) if (event->button () == Qt::LeftButton) { ui->label->setText ("左键被按下" +QString (" (x:%1,y:%2) " ).arg (event->x ()).arg (event->y ())); } else if (event->button () == Qt::RightButton) { ui->label->setText ("右键被按下" +QString (" (x:%1,y:%2) " ).arg (event->x ()).arg (event->y ())); } else if (event->button () == Qt::MidButton) { ui->label->setText ("中间键被按下" +QString (" (x:%1,y:%2) " ).arg (event->x ()).arg (event->y ())); } } void Widget::mouseReleaseEvent (QMouseEvent *event) if (event->button () == Qt::LeftButton) { ui->label->setText ("左键被抬起" +QString (" (x:%1,y:%2) " ).arg (event->x ()).arg (event->y ())); } else if (event->button () == Qt::RightButton) { ui->label->setText ("右键被抬起" +QString (" (x:%1,y:%2) " ).arg (event->x ()).arg (event->y ())); } else if (event->button () == Qt::MidButton) { ui->label->setText ("中间键被抬起" +QString (" (x:%1,y:%2) " ).arg (event->x ()).arg (event->y ())); } } void Widget::mouseDoubleClickEvent (QMouseEvent *event) if (event->button () == Qt::LeftButton) { ui->label->setText ("左键被双击" +QString (" (x:%1,y:%2) " ).arg (event->x ()).arg (event->y ())); } else if (event->button () == Qt::RightButton) { ui->label->setText ("右键被双击" +QString (" (x:%1,y:%2) " ).arg (event->x ()).arg (event->y ())); } else if (event->button () == Qt::MidButton) { ui->label->setText ("中间键被双击" +QString (" (x:%1,y:%2) " ).arg (event->x ()).arg (event->y ())); } }
20.4 纯净窗口移动
案例:
头文件:
1 2 3 4 5 6 7 8 9 10 11 12 13 14 15 16 17 18 19 20 21 22 23 24 25 26 27 28 29 30 31 32 33 34 35 #ifndef WIDGET_H #define WIDGET_H #include <QWidget> #include <QMouseEvent> #include <QPoint> QT_BEGIN_NAMESPACE namespace Ui { class Widget ; }QT_END_NAMESPACE class Widget : public QWidget{ Q_OBJECT public : Widget (QWidget *parent = nullptr ); ~Widget (); void mousePressEvent (QMouseEvent *event) override void mouseMoveEvent (QMouseEvent *event) override private : Ui::Widget *ui; QPoint p; }; #endif
源文件:
1 2 3 4 5 6 7 8 9 10 11 12 13 14 15 16 17 18 19 20 21 22 23 24 25 26 27 28 29 30 31 32 33 34 35 36 37 #include "widget.h" #include "ui_widget.h" Widget::Widget (QWidget *parent) : QWidget (parent) , ui (new Ui::Widget) { ui->setupUi (this ); this ->setWindowFlag (Qt::FramelessWindowHint); } Widget::~Widget () { delete ui; } void Widget::mousePressEvent (QMouseEvent *event) p = event->pos (); } void Widget::mouseMoveEvent (QMouseEvent *event) if (event->buttons () == Qt::LeftButton) { this ->move (event->globalPos () - p); } }
二一、绘制事件
1> 绘制事件是qt提供的二维图形引擎,能够让用户绘制各种图形,例如:适量文字、绘制图形、图像。。。
2> 绘制事件处理函数触发情况:窗口第一次展示、窗口最小化、最大化、窗口从覆盖状态显示出来、手动拖动窗口调大小、调用update函数
3> 绘制事件,依赖于画家类(QPainter)实现相关绘制工作
1 [virtual protected ] void QWidget::paintEvent (QPaintEvent *event)
4> 案例
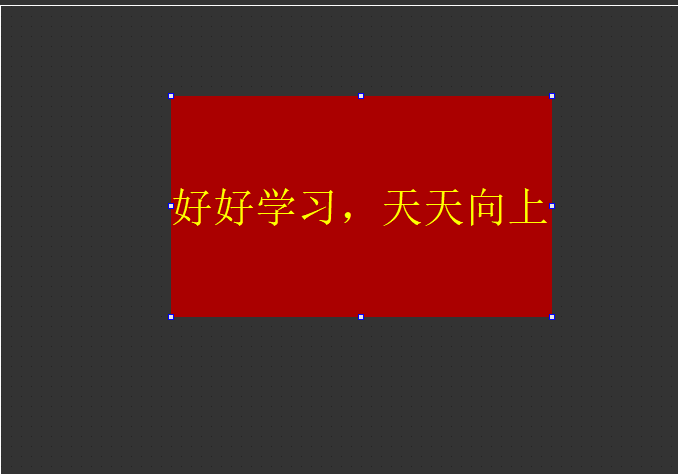
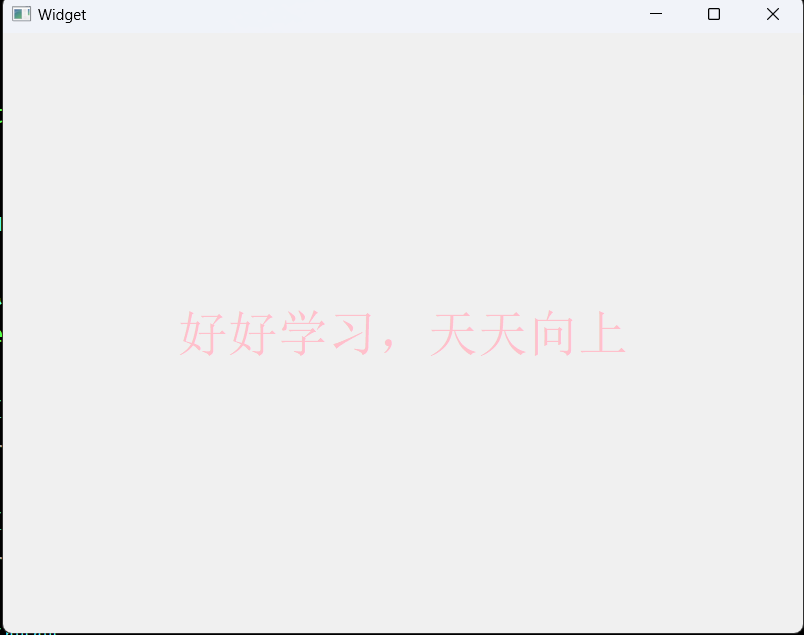
案例:水印
头文件:
1 2 3 4 5 6 7 8 9 10 11 12 13 14 15 16 17 18 19 20 21 22 23 24 25 26 27 28 29 30 31 32 #ifndef WIDGET_H #define WIDGET_H #include <QWidget> #include <QPaintEvent> #include <QDebug> #include <QPainter> QT_BEGIN_NAMESPACE namespace Ui { class Widget ; }QT_END_NAMESPACE class Widget : public QWidget{ Q_OBJECT public : Widget (QWidget *parent = nullptr ); ~Widget (); void paintEvent (QPaintEvent *event) override private : Ui::Widget *ui; }; #endif
源文件:
1 2 3 4 5 6 7 8 9 10 11 12 13 14 15 16 17 18 19 20 21 22 23 24 25 26 27 28 29 30 31 32 33 34 35 36 37 38 39 40 41 42 43 44 45 #include "widget.h" #include "ui_widget.h" Widget::Widget (QWidget *parent) : QWidget (parent) , ui (new Ui::Widget) { ui->setupUi (this ); } Widget::~Widget () { delete ui; } void Widget::paintEvent (QPaintEvent *event) QPainter painter (this ) ; painter.setPen (QColor ("pink" )); painter.setFont (QFont ("隶书" ,30 ,45 )); painter.drawText (this ->rect (),Qt::AlignCenter,"好好学习,天天向上" ); }
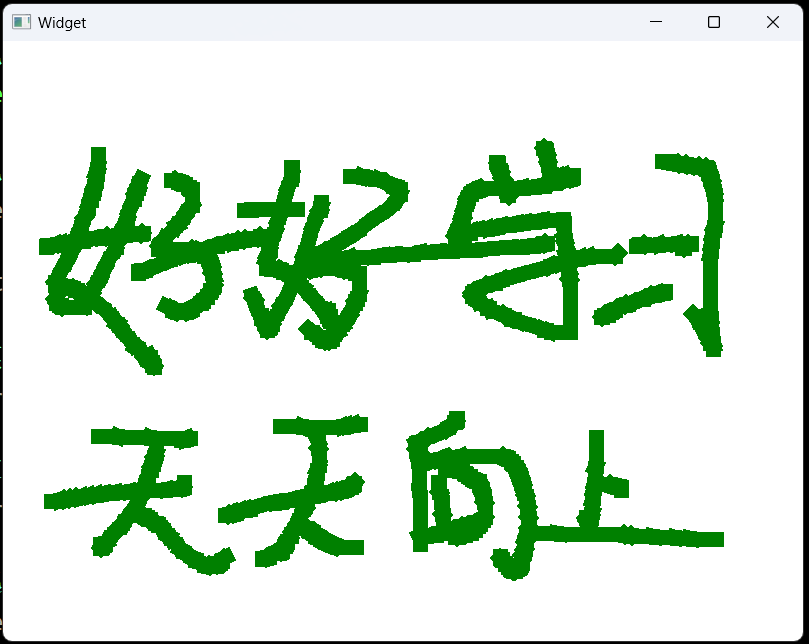
案例:画图板
头文件:
1 2 3 4 5 6 7 8 9 10 11 12 13 14 15 16 17 18 19 20 21 22 23 24 25 26 27 28 29 30 31 32 33 34 35 36 37 38 39 40 41 #ifndef WIDGET_H #define WIDGET_H #include <QWidget> #include <QMouseEvent> #include <QPaintEvent> #include <QPoint> #include <QPainter> #include <QPixmap> #include <QPen> QT_BEGIN_NAMESPACE namespace Ui { class Widget ; }QT_END_NAMESPACE class Widget : public QWidget{ Q_OBJECT public : Widget (QWidget *parent = nullptr ); ~Widget (); void mousePressEvent (QMouseEvent *event) override void mouseMoveEvent (QMouseEvent *event) override void paintEvent (QPaintEvent *event) override private : Ui::Widget *ui; QPoint p; QPixmap *pix; }; #endif
源文件:
1 2 3 4 5 6 7 8 9 10 11 12 13 14 15 16 17 18 19 20 21 22 23 24 25 26 27 28 29 30 31 32 33 34 35 36 37 38 39 40 41 42 43 44 45 46 47 48 49 50 51 52 53 54 55 56 57 58 59 60 61 62 63 64 65 66 67 68 69 70 71 72 73 74 75 #include "widget.h" #include "ui_widget.h" Widget::Widget (QWidget *parent) : QWidget (parent) , ui (new Ui::Widget) { ui->setupUi (this ); pix = new QPixmap (this ->width (),this ->height ()); pix->fill (); } Widget::~Widget () { delete ui; } void Widget::mousePressEvent (QMouseEvent *event) p = event->pos (); } void Widget::mouseMoveEvent (QMouseEvent *event) QPainter painter (pix) ; QPen pen (QColor("green" )) ; pen.setWidth (15 ); painter.setPen (pen); painter.drawLine (p, event->pos ()); p = event->pos (); this ->update (); } void Widget::paintEvent (QPaintEvent *event) QPainter painter (this ) ; painter.drawPixmap (QPoint (0 ,0 ),*pix); }
二二、QT实现连接TCP协议
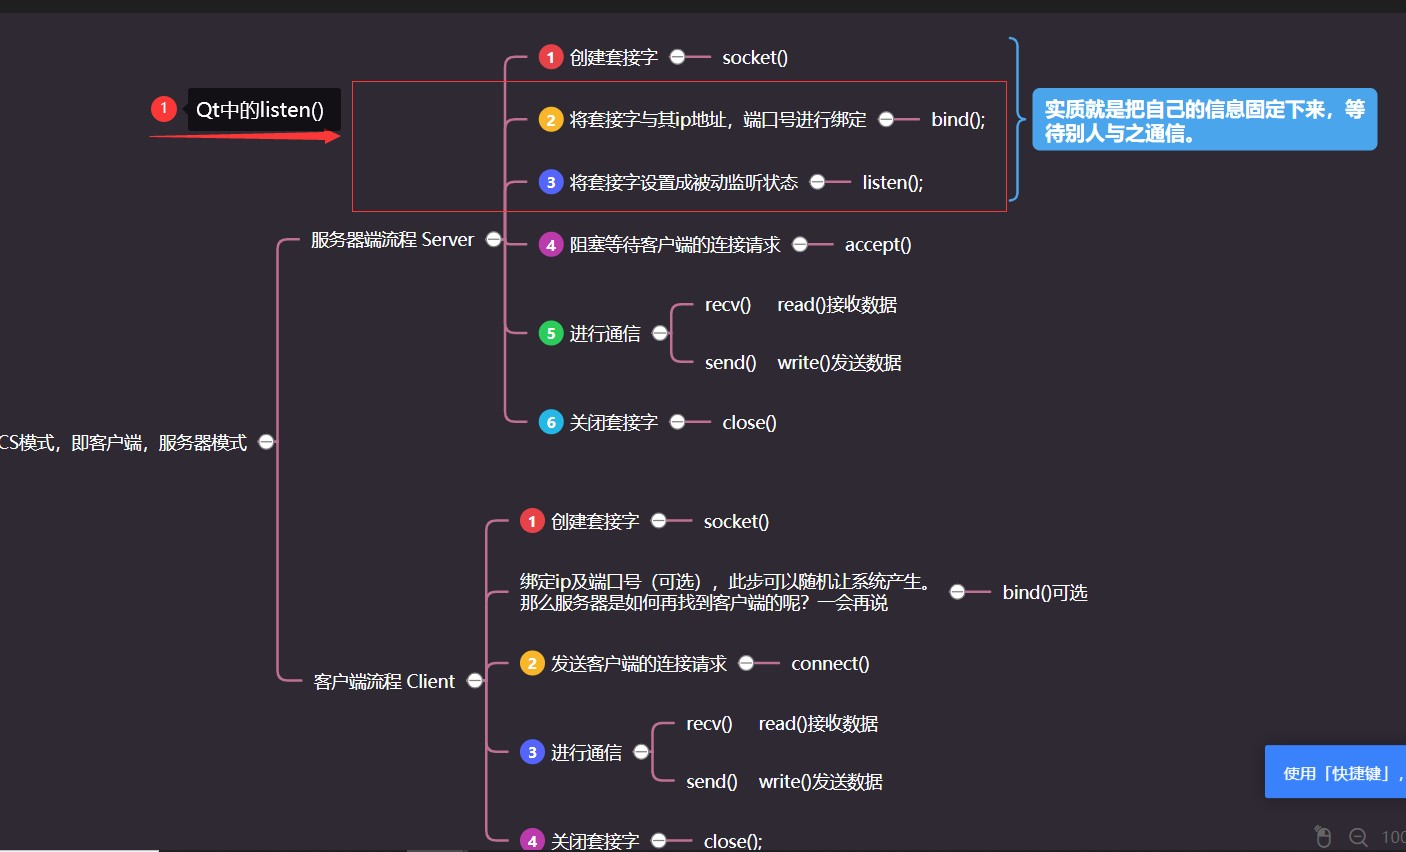
22.1 基于TCP的通信原理(复习)
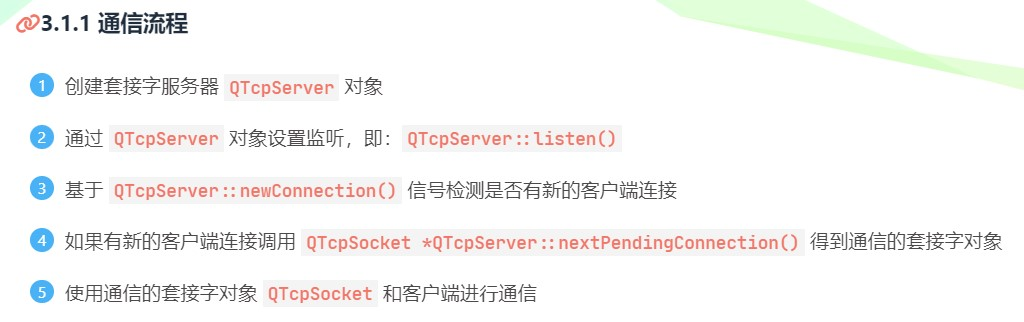
22.2 QT中实现服务器原理
22.3 QT中实现客户端原理
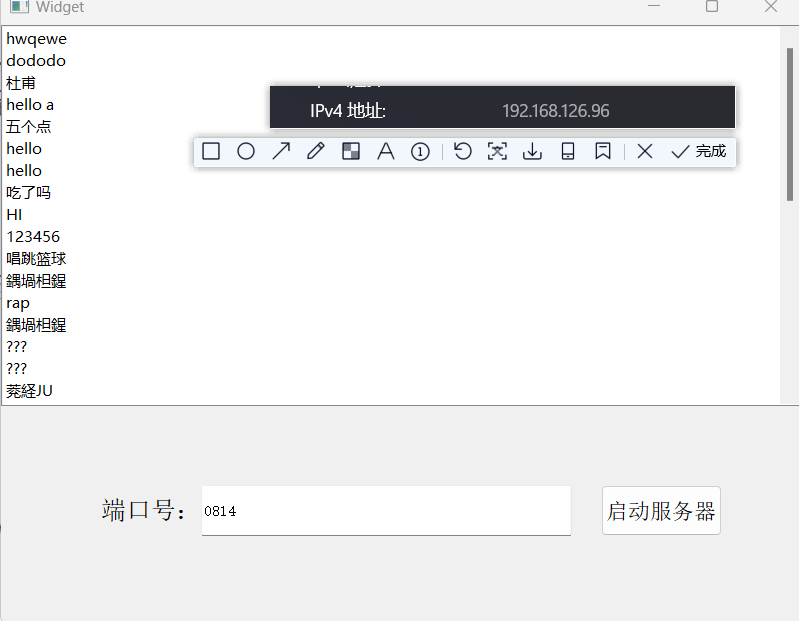
22.4 网络聊天室服务器实现
1> 使用QTcpSever实例化一个服务器对象
2> 设置监听,通过listen()函数,监听时,可以监听指定主机,也可以监听任意主机,设置端口号,可以是系统提供的端口号,也可以是指定的端口号
3> 如果有客户端发来连接请求,那么服务器端就是自动发射一个newConnection信号,我们就可以将该信号连接到自定义的槽函数中,在槽函数中获取客户端的套接字,将客户端的套接字存放到客户端容器中。
4> 调用nextPaddingConnection函数,可以获取最新连接的客户端套接字。
5> 当客户端向服务器发来数据时,那么客户端就会自动发射一个readyRead信号,我们就可以将该信号连接到自定义的槽函数中读取数据。
6> 使用read()、readLine()、readAll()读取套接字中数据,使用write()往套接字中写入数据
7> 调用close()关闭服务器
实例:
头文件:
1 2 3 4 5 6 7 8 9 10 11 12 13 14 15 16 17 18 19 20 21 22 23 24 25 26 27 28 29 30 31 32 33 34 35 36 37 38 39 40 41 42 43 44 45 46 47 48 49 50 51 52 53 #ifndef WIDGET_H #define WIDGET_H #include <QWidget> #include <QTcpServer> #include <QMessageBox> #include <QTcpSocket> #include <QList> QT_BEGIN_NAMESPACE namespace Ui { class Widget ; }QT_END_NAMESPACE class Widget : public QWidget{ Q_OBJECT public : Widget (QWidget *parent = nullptr ); ~Widget (); private slots: void on_startBtn_clicked () public slots: void newConnection_slot () void readyRead_slot () private : Ui::Widget *ui; QTcpServer *server; QList<QTcpSocket *> socketList; }; #endif
源文件:
1 2 3 4 5 6 7 8 9 10 11 12 13 14 15 16 17 18 19 20 21 22 23 24 25 26 27 28 29 30 31 32 33 34 35 36 37 38 39 40 41 42 43 44 45 46 47 48 49 50 51 52 53 54 55 56 57 58 59 60 61 62 63 64 65 66 67 68 69 70 71 72 73 74 75 76 77 78 79 80 81 82 83 84 85 86 87 88 89 90 91 92 93 94 95 96 97 98 99 100 101 102 103 104 105 106 107 108 109 110 111 112 113 114 115 116 117 118 119 120 121 122 123 124 #include "widget.h" #include "ui_widget.h" Widget::Widget (QWidget *parent) : QWidget (parent) , ui (new Ui::Widget) { ui->setupUi (this ); server = new QTcpServer (this ); } Widget::~Widget () { delete ui; } void Widget::on_startBtn_clicked () quint16 port = ui->portEdit->text ().toUInt (); if ( server->listen (QHostAddress::Any,port) ) { QMessageBox::information (this ,"" ,"启动服务器成功!" ); } else { QMessageBox::information (this ,"" ,"启动服务器失败!" ); return ; } connect (server, &QTcpServer::newConnection, this , &Widget::newConnection_slot); } void Widget::newConnection_slot () QTcpSocket *s = server->nextPendingConnection (); socketList.push_back (s); connect (s,&QTcpSocket::readyRead, this , &Widget::readyRead_slot); } void Widget::readyRead_slot () for (int i=0 ; i<socketList.count (); i++) { if ( socketList.at (i)->state () == 0 ) { socketList.removeAt (i); } } for (int i=0 ; i<socketList.count (); i++) { if ( socketList.at (i)->bytesAvailable () !=0 ) { QByteArray msg = socketList.at (i)->readAll (); ui->msgWidget->addItem (QString::fromLocal8Bit (msg)); for (int j=0 ; j<socketList.count ();j++) { socketList.at (j)->write (msg); } } } }
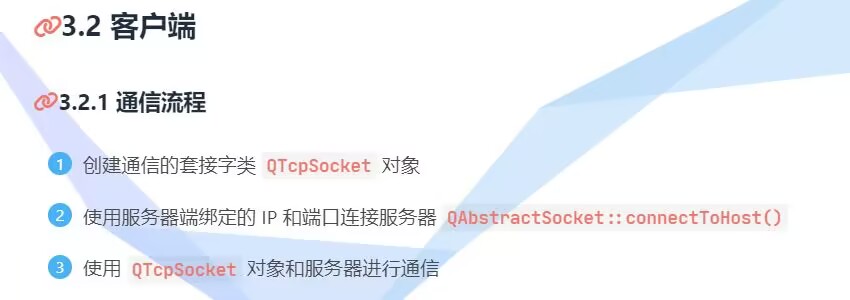
22.5 网络聊天室客户端实现
1> 使用QTcpSocket实例化一个客户端对象
2> 将客户端连接服务器主机,使用connectToHost()函数,给定服务器主机地址和端口号
3> 如果客户端成功连接到服务器,那么客户端就会自动发射一个connected信号,我们就可以将该信号连接到自定义的槽函数中,在槽函数中处理逻辑代码。
4> 此时说明客户端和服务器建立了连接,如果服务器发来数据,那么客户端就会自动发射一个readyRead信号,我们就可以将该信号连接到自定义的槽函数中,读取服务器发来的数据。
5> 调用read()、readLine()、readAll()读取数据,调用write()写入数据。
6>可以使用disconnectFromHost函数断开与服务器的连接,如果与服务器成功断开连接,那么客户端就会自动发射一个disconnected信号,我们就可以将该信号连接到自定义的槽函数中,处理相关逻辑代码。
案例:
头文件:
1 2 3 4 5 6 7 8 9 10 11 12 13 14 15 16 17 18 19 20 21 22 23 24 25 26 27 28 29 30 31 32 33 34 35 36 37 38 39 40 41 42 43 44 45 46 47 48 49 50 51 #ifndef WIDGET_H #define WIDGET_H #include <QWidget> #include <QTcpSocket> #include <QMessageBox> QT_BEGIN_NAMESPACE namespace Ui { class Widget ; }QT_END_NAMESPACE class Widget : public QWidget{ Q_OBJECT public : Widget (QWidget *parent = nullptr ); ~Widget (); private slots: void on_connectBtn_clicked () void on_sendBtn_clicked () void on_disconnectBtn_clicked () public slots: void connected_slot () void readyRead_slot () void disconnected_slot () private : Ui::Widget *ui; QTcpSocket *socket; QString userName; }; #endif
源文件:
1 2 3 4 5 6 7 8 9 10 11 12 13 14 15 16 17 18 19 20 21 22 23 24 25 26 27 28 29 30 31 32 33 34 35 36 37 38 39 40 41 42 43 44 45 46 47 48 49 50 51 52 53 54 55 56 57 58 59 60 61 62 63 64 65 66 67 68 69 70 71 72 73 74 75 76 77 78 79 80 81 82 83 84 85 86 87 88 89 90 91 92 93 94 95 96 97 98 99 100 101 102 103 104 105 106 107 108 109 110 111 112 113 114 115 116 117 118 119 120 121 122 123 124 125 126 127 128 129 130 131 132 133 134 135 136 137 138 139 140 141 142 143 144 145 146 147 148 149 150 151 152 153 154 155 156 157 158 159 160 161 162 163 164 165 166 167 168 169 170 171 172 173 174 175 176 177 178 179 180 #include "widget.h" #include "ui_widget.h" Widget::Widget (QWidget *parent) : QWidget (parent) , ui (new Ui::Widget) { ui->setupUi (this ); socket = new QTcpSocket (this ); ui->msgEdit->setEnabled (false ); ui->sendBtn->setEnabled (false ); ui->disconnectBtn->setEnabled (false ); connect (socket, &QTcpSocket::connected, this , &Widget::connected_slot); connect (socket, &QTcpSocket::readyRead, this , &Widget::readyRead_slot); connect (socket, &QTcpSocket::disconnected, this , &Widget::disconnected_slot); } Widget::~Widget () { delete ui; } void Widget::on_connectBtn_clicked () QString ip = ui->ipEdit->text (); quint16 port = ui->portEdit->text ().toUInt (); socket->connectToHost (ip, port); } void Widget::connected_slot () QMessageBox::information (this ,"" ,"连接服务器成功!" ); userName = ui->userNameEdit->text (); QString msg = userName + ": 进入聊天室" ; socket->write (msg.toLocal8Bit ()); ui->msgEdit->setEnabled (true ); ui->sendBtn->setEnabled (true ); ui->disconnectBtn->setEnabled (true ); ui->userNameEdit->setEnabled (false ); ui->ipEdit->setEnabled (false ); ui->portEdit->setEnabled (false ); ui->connectBtn->setEnabled (false ); } void Widget::readyRead_slot () QByteArray msg = socket->readAll (); ui->msgWidget->addItem (QString::fromLocal8Bit (msg)); } void Widget::on_sendBtn_clicked () QString msg = userName + ": " + ui->msgEdit->text (); socket->write (msg.toLocal8Bit ()); ui->msgEdit->clear (); } void Widget::on_disconnectBtn_clicked () QString msg = userName + ": 离开聊天室" ; socket->write (msg.toLocal8Bit ()); socket->disconnectFromHost (); } void Widget::disconnected_slot () QMessageBox::information (this ,"" ,"断开连接" ); ui->msgEdit->setEnabled (false ); ui->sendBtn->setEnabled (false ); ui->disconnectBtn->setEnabled (false ); ui->userNameEdit->setEnabled (true ); ui->ipEdit->setEnabled (true ); ui->portEdit->setEnabled (true ); ui->connectBtn->setEnabled (true ); }
二三、QT实现连接数据库
23.1 QT将数据库分为三个层次
1> 数据库驱动层:QSqlDriver、 QSqlDriverCreator、 QSqlDriverCreatorBase、 QSqlDriverPlugin
2> sql接口层:**QSqlDatabase、 QSqlQuery、 QSqlRecord、**QSqlError
3> 用户接口层**:提供一些模型 QSqlQueryModel、 QSqlTableModel、 QSqlRelationalTableModel**
23.2 实现数据库操作的相关方法
1 2 3 4 5 6 7 8 9 10 11 1 、添加数据库:[static ] QSqlDatabase QSqlDatabase::addDatabase (QSqlDriver *driver, const QString &connectionName = QLatin1String(defaultConnection)) QSQLITE SQLite version 3 or above 2、设置数据库名称:void QSqlDatabase::setDatabaseName (const QString &name) 3、包含数据库:bool QSqlDatabase::contains (const QString &connectionName = QLatin1String(defaultConnection)) 4、打开数据库:bool QSqlDriver::open (const QString &db) 5、关闭数据库:void QSqlDatabase::close () 6、错误信息:QSqlError QSqlDatabase::lastError () 7、sql语句执行:构造一个QSqlQuery类对象,调用其成员函数exec,执行sql语句:bool QSqlQuery::exec (const QString &query) 8、bool QSqlQuery::next () :遍历查询结果的函数